


On June 3, 2026, Cloudflare quietly launched something that flew under most homelab radars: self-managed OAuth clients. The announcement landed on the Cloudflare Fundamentals changelog, not the main blog. But for anyone running services behind Cloudflare — DNS, Tunnels, Zero Trust, Workers — this changes how you manage API access.
I run my entire homelab behind Cloudflare. DNS records for every service, Zero Trust Access in front of internal dashboards, API tokens scattered across Terraform configs and cron jobs. Every one of those tokens is a static string with broad permissions that lives in a .env file or a CI variable. If one leaks, the damage radius is whatever permissions I gave it — usually more than it needed.
Self-managed OAuth replaces that model. Here's what it is, how it works, and why homelab users should care.
What Self-Managed OAuth Actually Is
OAuth is the protocol behind every "Sign in with Google" button you've ever clicked. A third-party app asks for permission to access your account, you see a consent screen listing exactly what it wants, and you approve or deny it. The app never sees your password. It gets a short-lived token scoped to only the permissions you approved.
Cloudflare has supported OAuth for years — but only for apps that Cloudflare itself built, like Wrangler (the Workers CLI). If you wanted your own tool to talk to the Cloudflare API, you generated an API token from the dashboard, copied the string, and pasted it wherever it needed to go. That token sat there until you manually revoked it.
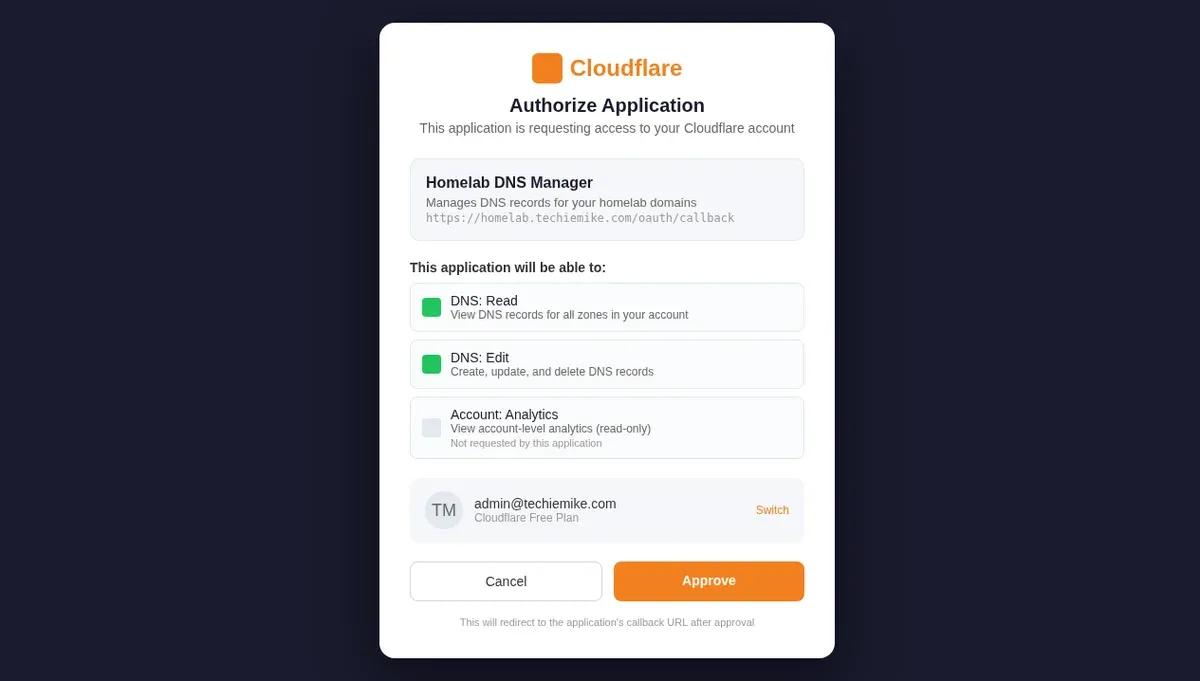
Self-managed OAuth means you can now create your own OAuth applications — the same kind Cloudflare uses internally. Your app gets a client ID and secret, users go through a consent flow, and the resulting access token has only the scopes you defined when you created the application. No static strings. No over-provisioned permissions. No token sitting in a plaintext config file for six months after you stopped using it.
How It Compares to API Tokens
If you've used Cloudflare API tokens before, the scope system will look familiar. You pick which parts of the account the application can touch — DNS read, DNS edit, Zone settings, Account-level analytics, Workers deployment, and so on. The difference is in how those permissions get enforced.
| API Tokens | Self-Managed OAuth | |
|---|---|---|
| Storage | Static string in config/env | Client ID + secret (one-time setup), then short-lived access tokens |
| Permission model | Set at token creation, rarely reviewed | Scopes shown to user on consent screen every time |
| Revocation | Manual — find the token, delete it | Revoke the application or the user's grant independently |
| Auditability | Token was used — that's about it | Per-user grants, consent timestamps, scope history |
| User identity | The token is the identity | Tied to a specific Cloudflare user account |
For a homelab, the killer feature is the consent screen. Every person who uses your OAuth application sees exactly what permissions they're granting before they click approve. With API tokens, you copy a string and hope whoever has it doesn't abuse it. With OAuth, the scope is transparent and the grant is deliberate.
What This Means for Homelab Users
Most homelab users aren't building third-party SaaS products. So why does this matter?
Three likely future use cases — with one current limitation.
There is one important limitation: Cloudflare currently supports Authorization Code flow for third-party OAuth clients. That works well for web apps, CLIs, desktop apps, and tools that can complete a browser-based login. It is less straightforward for unattended CI/CD pipelines and cron jobs because Cloudflare does not currently support Client Credentials or Device Authorization flows for third-party clients.
Terraform and infrastructure-as-code. If you manage Cloudflare DNS with Terraform — and plenty of homelabbers do, because it beats clicking around the dashboard — you currently store an API token with DNS edit permissions — it sits in your Terraform state or variables file. That token has full write access to every DNS zone in your account. With self-managed OAuth, you create an application with DNS read and DNS edit scopes, and when Terraform providers and related tooling support Cloudflare OAuth authentication, the access token is scoped and short-lived. If your Terraform state leaks, the damage is contained.
CI/CD pipelines. GitHub Actions deploying to Cloudflare Pages, Workers, or updating DNS records as part of a deploy pipeline — every one of those needs an API token today. Self-managed OAuth points toward a better model for CI/CD, but today unattended pipelines may still need API tokens unless the workflow can complete an Authorization Code flow securely. When tooling catches up, the payoff is real: revoke one contributor's grant instead of rotating tokens across every pipeline.
Automation scripts and cron jobs. I run scripts that update DNS records, check zone analytics, and rotate origin certificates. Each one has its own API token with more permissions than it strictly needs because creating a narrowly-scoped token for every small script is tedious. Self-managed OAuth makes narrow scoping practical for interactive tools and backend services, but unattended cron jobs may still need API tokens until Cloudflare supports a non-interactive OAuth flow or the tooling handles refresh securely. When those pieces land, the model is clear: one OAuth application per automation domain, a grant per user or service account, and the consent flow handles the rest.
The common thread: you stop managing tokens and start managing access.
Setting It Up — Where to Start
Self-managed OAuth is available on all Cloudflare plans, including the free tier. Here's the setup path.
First, navigate to Manage Account → OAuth Clients in the Cloudflare dashboard. This is where you create and manage OAuth applications.

When you create an application, you'll define:
- Name and description. What is this application, and who is it for? Be specific — "Homelab Terraform DNS Manager" is better than "my app."
- Redirect URLs. Where Cloudflare sends the user after they approve or deny the consent request. For a CLI tool, this is typically a localhost URL. For a web app, it's your callback endpoint.
- Scopes. The permissions your application requests. Pick only what you need. If your Terraform config only manages DNS, don't request Workers or Analytics scopes.
- Visibility. Applications start as private — only members of your Cloudflare account can use them. This is the right setting for homelab use. Public visibility requires domain verification and is meant for apps distributed to other Cloudflare users.
Once the application is created, you get a client ID and client secret. The client ID is public — it identifies your application in the OAuth flow. The client secret is private — treat it like a password. Store it in a secrets manager or encrypted config, never in plaintext in a repo.
Security Implications — The Good and The Trade-offs
Self-managed OAuth improves your security posture in ways that matter for a homelab.
Least privilege becomes practical. API tokens reward laziness — it's easier to create one "edit all the things" token than ten narrowly-scoped ones. OAuth applications make narrow scoping the default. You define scopes once at application creation, and every access token inherits them.
Revocation is granular. With API tokens, you revoke the entire token and break everything that used it. With OAuth, you can revoke a single user's grant without touching other users of the same application. If a service account gets compromised, you cut off that grant and everything else keeps working.
No long-lived static secrets. API tokens sit in config files indefinitely. OAuth access tokens expire. Refresh tokens can be rotated. The window for a leaked credential to be useful is measured in hours, not months.
The trade-offs are worth noting.
More moving parts. OAuth adds a consent flow to your authentication pipeline. For a CLI tool that previously just read an environment variable, you now need to handle the browser-based Authorization Code flow.
Client secret is still a secret. You're trading one static secret (the API token) for another (the client secret). The difference is that the client secret is used only during the OAuth handshake, not for every API call. The access token that actually hits the API is short-lived and scoped.
Setup is more involved. Creating an API token takes 30 seconds. Setting up an OAuth application, configuring redirect URLs, and integrating the OAuth flow into your tool takes longer. The payoff is in ongoing security, not initial convenience.
Practical Takeaways for the Homelab
Here's what I'd suggest for a homelab user who wants to adopt this.
Start with your highest-risk tokens. Audit the API tokens you currently have in your Cloudflare account. Find the ones with the broadest permissions — the "edit all zones" tokens, the ones shared across multiple services, the ones you created a year ago and forgot about. Migrate those first.
Create one OAuth application per role, not per script. You don't need a separate OAuth application for every cron job. Group by function: DNS management, Workers deployment, analytics reporting. Each application gets the minimum scopes for that role, and multiple scripts or tools can use the same application.
Keep private visibility. Unless you're building a tool for other Cloudflare users, leave your applications set to private. Private applications are only usable by members of your Cloudflare account — which is exactly what you want for homelab automation.
Rotate client secrets. Treat client secrets the same way you'd treat API tokens — rotate them periodically. Cloudflare doesn't enforce rotation, so build it into your maintenance routine.
Monitor your grants. The OAuth Clients page in the dashboard shows which users have granted consent to each application. Check it occasionally. Revoke grants for users or service accounts you no longer need.
Self-managed OAuth isn't going to replace API tokens overnight — plenty of tools and Terraform providers still expect a static token. But the direction is clear. Cloudflare is building the infrastructure for a world where API access is scoped, consented, and auditable rather than a string you copy once and forget.
For a homelab, that's one less thing to lose sleep over.
