

You push code. Tests pass. Merge. Deploy. It feels good when it works.
But if you've ever pushed a change that broke production because "nobody ran the tests," you know the pain of a missing CI/CD test pipeline. I've been there — releasing a Python script that worked on my machine but crashed on the server because I forgot a dependency. That's the kind of bug basic test automation catches before it reaches anyone.
In this guide, I'll walk through setting up a test pipeline with GitHub Actions that runs on every push. It's the same approach I use for my own projects, and it costs nothing to start. If you're curious about AI-powered coding tools, I've compared Cursor AI vs VS Code separately — this post is about the automation that runs once your code is written.
Here's what we'll cover:
- What a test pipeline does (and why you need one)
- Setting up GitHub Actions for a Python project
- Adding multiple test stages — lint, unit, integration
- Getting notified when tests fail
- Running the pipeline on your own self-hosted hardware
- Common mistakes I've made so you don't have to
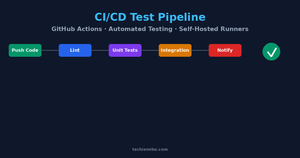
What a Test Pipeline Actually Does
A test pipeline is automation that runs your tests every time you push code. No manual intervention, no "I'll test it later," no forgotten steps.
The basic flow looks like this:
- You push code to your repository
- GitHub detects the push and starts the pipeline
- The pipeline checks out your code, installs dependencies, and runs your tests
- You get a pass or fail result in the GitHub UI (and optionally via email, Slack, or Discord)
That's the minimum. A good pipeline goes further by running different types of tests at different stages, so you catch issues early and know exactly what failed.
Setting Up Your First Pipeline
Let's start with a Python project. I'll use a FastAPI web app as an example, but the same structure works for Node.js, Go, or anything else.
Create a file at .github/workflows/test.yml in your repository:
name: Test Pipeline\n\non:\n push:\n branches: [main, develop]\n pull_request:\n branches: [main]\n\njobs:\n test:\n runs-on: ubuntu-latest\n\n steps:\n - uses: actions/checkout@v4\n\n - name: Set up Python\n uses: actions/setup-python@v5\n with:\n python-version: '3.12'\n\n - name: Install dependencies\n run: |\n python -m pip install --upgrade pip\n pip install -r requirements.txt\n pip install pytest pytest-cov\n\n - name: Run tests\n run: pytest --cov=./ --cov-report=term-missing\n\n - name: Upload coverage report\n uses: actions/upload-artifact@v4\n with:\n name: coverage-report\n path: coverage.xml\nThis is the simplest useful pipeline. Every time you push to main or develop, or open a pull request against main, it installs your dependencies and runs pytest with coverage reporting.
What I found: Adding the --cov-report=term-missing flag shows you exactly which lines aren't tested. That alone caught several untested edge cases in my projects.
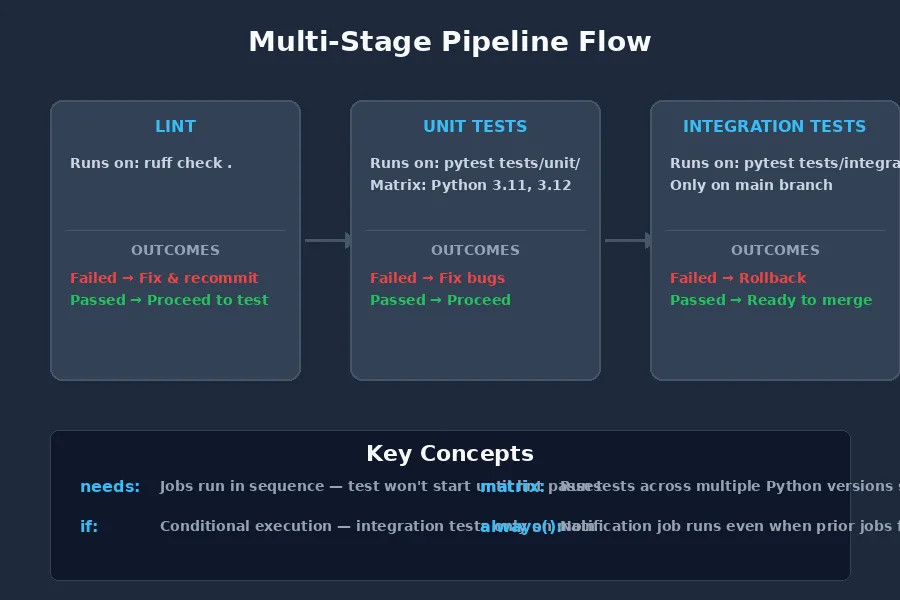
Multi-Stage Pipelines: Catch Issues Earlier
The single-job pipeline above works, but it has a problem — if your linting fails, you still wait for the whole test suite to finish. Splitting into stages runs faster and tells you immediately what's wrong.
name: Test Pipeline\n\non:\n push:\n branches: [main, develop]\n pull_request:\n branches: [main]\n\njobs:\n lint:\n runs-on: ubuntu-latest\n steps:\n - uses: actions/checkout@v4\n - uses: actions/setup-python@v5\n with:\n python-version: '3.12'\n - run: pip install ruff\n - run: ruff check .\n\n test:\n needs: lint\n runs-on: ubuntu-latest\n strategy:\n matrix:\n python-version: ['3.11', '3.12']\n\n steps:\n - uses: actions/checkout@v4\n - name: Set up Python ${{ matrix.python-version }}\n uses: actions/setup-python@v5\n with:\n python-version: ${{ matrix.python-version }}\n\n - name: Install dependencies\n run: |\n pip install -r requirements.txt\n pip install pytest\n\n - name: Run unit tests\n run: pytest tests/unit/ -v\n\n - name: Run integration tests\n if: github.ref == 'refs/heads/main'\n run: pytest tests/integration/ -v\nNotice a few things here:
The needs: lint line means the test job won't start until linting passes. If your code has formatting issues, you know within 30 seconds instead of waiting for a full test run.
The matrix strategy runs tests against Python 3.11 and 3.12 simultaneously. A bug that only appears on a specific version gets caught before it reaches users on that version.
Integration tests only run on main — not on every branch push. Integration tests are slower and often need external services. Running them only when merging to the main branch saves time without losing coverage.
Getting Notified When Tests Fail
A pipeline only helps if you know when it breaks. GitHub shows pass/fail on every commit and PR, but I also want a notification I can't miss. After my experience with AI coding tools that silently broke my projects, I learned the hard way: if you don't get notified immediately, bugs slip through.
The simplest option is email notifications — GitHub sends them automatically for failed workflows on repositories you watch. But I prefer something I check more often.
Here's how I add a Discord webhook notification:
notify:\n needs: [lint, test]\n if: always() && (needs.lint.result == 'failure' || needs.test.result == 'failure')\n runs-on: ubuntu-latest\n steps:\n - name: Send Discord notification\n env:\n DISCORD_WEBHOOK: ${{ secrets.DISCORD_WEBHOOK }}\n run: |\n curl -H "Content-Type: application/json" \\\n -d '{"content": "Test pipeline failed on ${{ github.repository }} — ${{ github.server_url }}/${{ github.repository }}/actions/runs/${{ github.run_id }}"}' \\\n $DISCORD_WEBHOOK\nThe always() function is important — it makes the notification job run even if a previous job failed. Without it, GitHub won't run the notification job at all when tests fail.
Replace DISCORD_WEBHOOK with Slack, Telegram, or email as needed. I use Discord because it's open on my phone and desktop 24/7, and I've covered how to set up notification services in other posts on the site.
Running on Your Own Hardware
GitHub-hosted runners are fine for small projects — you get 2,000 minutes free per month. But if you're running heavy builds or want to cache Docker images locally, a self-hosted runner makes more sense.
I run a self-hosted runner on my BMAX Pro 8 mini PC. If you're looking to set up a home lab for this kind of work, my Proxmox Homelab Guide covers the hardware setup and Linux basics. Here's why I went self-hosted:
- No minute limits. My pipeline runs Docker builds with 5+ minute test suites. A few PRs per day would eat through the free quota fast.
- Local caching. Dependencies I install once stay cached on the runner's NVMe drive — no waiting for pip install on every run.
- Network access. Integration tests that need to hit a local API or database work naturally.
Setting up a self-hosted runner takes about 10 minutes:
- Go to your repo: Settings > Actions > Runners > New self-hosted runner
- Choose your OS and architecture
- Run the setup commands on your machine
- Start the runner with
./run.sh
One thing that tripped me up: self-hosted runners run as a user on your machine, so any Docker commands or file permissions need to work for that user. I had to add my runner user to the docker group before Docker-based tests would run.
# After registering the runner on your mini PC or server\ncd actions-runner\nsudo ./svc.sh install\nsudo ./svc.sh start\nThe svc.sh script installs the runner as a systemd service so it starts automatically when your machine boots. Without this, you'll have to SSH in and restart the runner after every power outage.
Common Mistakes and How to Avoid Them
I've broken my own pipeline more times than I'd like to admit. Here are the mistakes I see most often:
1. Forgetting to pin action versions. Using actions/checkout@v4 is fine. Using actions/checkout@main will break when the main branch gets a breaking update. Always pin to a specific major version or commit hash.
2. Running slow tests on every push. End-to-end tests that take 15 minutes shouldn't run on every typo fix. Split them into a separate workflow that only runs on main pushes or nightly cron jobs.
3. Not testing the pipeline itself. A pipeline YAML can have syntax errors that you don't notice until a push triggers it — and then you're debugging in the GitHub Actions tab. Validate your workflow locally:
# Install the GitHub Actions validator\npip install action-validator\n\n# Check your workflow files\naction-validator .github/workflows/test.yml\nI keep this command in my pre-commit hooks so I never push a broken workflow. It's saved me from myself at least a dozen times.
4. Hardcoding secrets in workflow files. Use GitHub Secrets for API keys, tokens, and webhook URLs. I made this mistake once with a database URL — the secret was exposed in the Actions log for anyone who had repo access. GitHub Secrets encrypts values and only exposes them as environment variables at runtime.
5. Ignoring flaky tests. If a test fails intermittently, don't retry it automatically. GitHub Actions has a retry option for steps, but I've found it masks real problems. Instead, mark flaky tests with a decorator and fix them properly:
import pytest\n\n@pytest.mark.flaky(reruns=0) # Don't retry — fix the root cause\ndef test_sometimes_fails():\n # Test that needs proper fixing\n pass\nI mark failing tests with @pytest.mark.skip temporarily, then create a GitHub issue to fix them. The issue stays open until the test is unskipped. This way, I never forget about a skipped test.
What Does a Healthy Pipeline Look Like?
After running test pipelines on several projects, here's what I aim for:
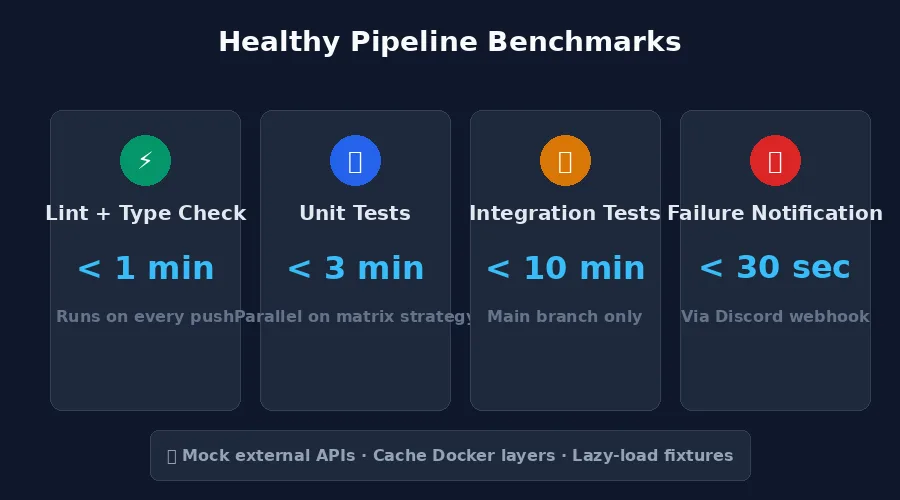
- Lint + type check completes under 1 minute
- Unit tests run in under 3 minutes
- Integration tests (main branch only) finish in under 10 minutes
- Notifications arrive within 30 seconds of a failure
If your pipeline is slower than this, look for tests that hit external APIs (mock them), tests that rebuild Docker images on every run (cache layers), or tests that load large fixtures into memory (lazy-load them).
The Bottom Line
A test pipeline doesn't need to be complicated to be useful. Start with a single workflow that runs pytest (or your framework's equivalent) on every push. That alone catches most regressions.
Once that's running, add linting, split into stages, and set up notifications. Then, if you outgrow GitHub's free tier, spin up a self-hosted runner on whatever hardware you have lying around.
My BMAX Pro 8 runs my test pipeline, my Hermes Agent instance, and a few Docker services simultaneously — all on a machine smaller than a paperback. That's the beauty of test automation on your own hardware: once it's set up, it just works, and you never have to worry about "tested on my machine" failures again.
The first time your pipeline catches a bug before you merge, you'll wonder why you didn't set it up sooner.
