Let’s Use TAILS
TAILS is an operating system designed for strong security. PGP is a groundbreaking encryption program that was invented in 1991 by Phil Zimmerman. PGP’s many versions became interoperable under a standard called OpenPGP. GnuPG, also known as GPG, is an implementation of PGP that follows the OpenPGP standard. If you are using GPG on TAILS, you are using PGP.
In order to ensure the confidentiality of data during transmission, to ensure its integrity, to prove that a message is authentic, and to decrypt confidential data:
(1) Choose a USB and a Device
Choose a device–a desktop, laptop, or netbook–that has never connected to the internet, and cannot touch the internet, even if it wanted to.
For learning purposes, however, you could use any device near to hand, but keep in mind that everything it does is just for practice. Don’t use any practice keys for encrypting real data, and don’t store private keys on a device that touches the big collection platform–unless those do not matter at all.
You are going to use TAILS as a live system on a USB. Live system means that the operating system is on your USB, and it will only run in the RAM of your computer. You want to make your computer boot from your live USB and not from your computer’s hard disk drive (HDD).
Note that some USB's are not compatible with TAILS:
- SanDisk Cruzer Edge 8 GB
- SanDisk Cruzer Extreme USB 3.0 16 GB, 32 GB and 64 GB
- SanDisk Cruzer Fit USB 2.0 8 GB, 16 GB, and 32G
- SanDisk Cruzer Force 8 GB
- SanDisk Cruzer Glide 4 GB, 8 GB and 16 GB
- SanDisk Cruzer Switch USB 2.0 8 GB and 32 GB
- SanDisk Cruzer USB 3.0 64 GB
- SanDisk Cruzer Blade 4 GB, 8 GB, and 32 GB
- SanDisk Cruzer Facet
- SanDisk Cruzer Orbiter 32 GB (hangs at installation time, but boots fine afterwards)
- SanDisk Ultra 16 GB, 32 GB
(2) Download TAILS
Most folks can use any computer and any browser to do this. Firefox will allow you to verify your download using an add-on from TAILS, which is very convenient.
Download from tail's website
If you are not familiar with TAILS, watch this outstanding video by the Center for Investigative Journalism in London:
They offer the best instruction available anywhere about how to set up TAILS and use GnuPG.
(3) Verify your download. This must be done if you download the ISO image
If you download the torrent, then Your BitTorrent client will automatically verify your download when it completes.
Here is a video that will tell you exactly how to verify your download:
(4) Choose a computer on which to use TAILS
Start with a computer to hand and make sure to set your copy of TAILS to “disable all networking” whenever you create files or perform encryption/decryption. This is the standard way to use TAILS.
If you wish to go to an extremely high level of security, dedicate one computer that never gets online, has never been online, cannot get online–ideally with no wireless antenna, no network interface card, no hard drive, no audio/microphone ports–that you will use to run your live USB with “disable all networking” checked every time. As with the standard setup, you will store your keys on an encrypted partition using a passphrase. You will also use the encrypted partition to store revocation certificates. A netbook will do nicely as this sort of base computer. Flashing its CMOS is not a bad idea before you start.
(5) Learn the difference between symmetric and asymmetric encryption
(6) Create keys
In PGP, including the version we will be using, GPG2, the certification key (C) is used to sign our sub-keys and to sign the keys of other people. The (C) key is often called the master key. The encryption key (E) encrypts and the signing key (S) signs. There is also an authentication key (A), which can be used in networking functions. You do not have to make an (A) key to encrypt, decrypt, sign, or verify data.
In GPG2, the default key construction is one master key which is (CS), and one (E) sub-key. The master key and the encryption sub-key are bound together.
How do the encryption (E) and signing (S) keys work? If Bob wants to encrypt a file to Alice, he uses Alice’s public key. It is called a “public key” because such halves of the key are often kept on a special computer called a key server. One especially important key server is at MIT. Alice will then decrypt that file with her private key. If Bob wants to sign a file so that Alice knows it came from him, then he signs it with his private key. Alice then verifies the file with Bob’s signing key, which can be publicly available.
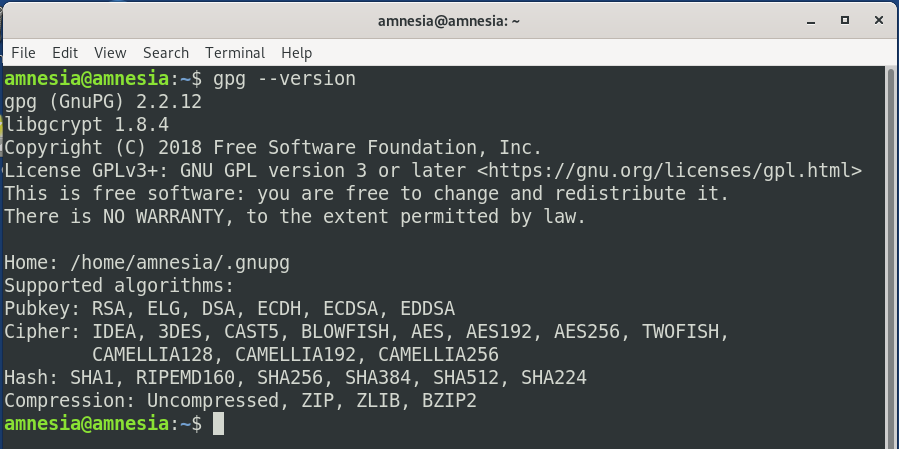
You will have some decisions to make about public key algorithms, symmetric algorithms, hashes, key sizes, and compression. So, let’s look at one way to make keys: in the terminal. Let’s open the terminal and enter: gpg2 –version

Now we are going to generate keys according to the default method. RSA will be used for the public key, and a set of 2048-bit keys will be generated for signing and encryption. The 2048-bit strength is not recommended for encrypting anything important.
Use
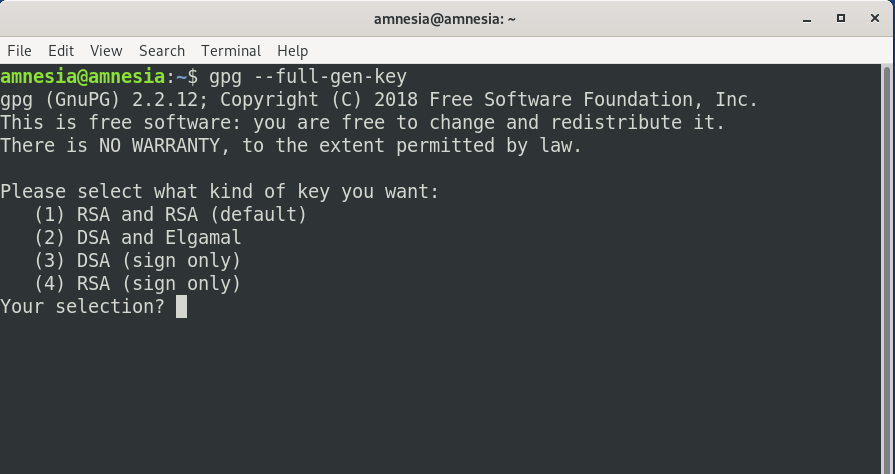
gpg --full-gen-keycommand to generate your key pair.
gpg --full-gen-key

It asks you what kind of key you want. Notice there’re four options. The default is to create a RSA public/private key pair and also a RSA signing key. Let’s hit Enter to select the default.
RSA keys may be between 1024 and 4096 bits long.
What keysize do you want? (2048)
Next it asks you the key length. The default is 2048 bits long. 1024 RSA key is obsolete. The longer 4096 RSA key will not provide more security than 2048 RSA key. So hit Enter to select the default.
Requested keysize is 2048 bits
Please specify how long the key should be valid.
 0 = key does not expire
 <n> = key expires in n days
 <n>w = key expires in n weeks
 <n>m = key expires in n months
 <n>y = key expires in n years
Key is valid for? (0)2y
After that it asks you how long the key should be valid, 2 years is fine. You can always update the expiration time later on.
Key expires at Sun 21 Jun 2020 12:29:24 AM UTC
Is this correct? (y/N)y
Now it asks you if it’s correct. Notice that the default is No. So press y then Enter to confirm it’s correct.
GnuPG needs to construct a user ID to identify your key.
 Real name: Techie Mike
 Email address: [email protected]
 Comment:
And now we need to provide some user identification information for the key. This is important because this information will be included in our key. It’s one way of indicating who is owner of this key. The email address is a unique identifier for a person. You can leave Comment blank.
You selected this USER-ID:
 "Techie Mike <[email protected]>"
Change (N)ame, (C)omment, (E)mail or (O)kay/(Q)uit? O
Select Okay.
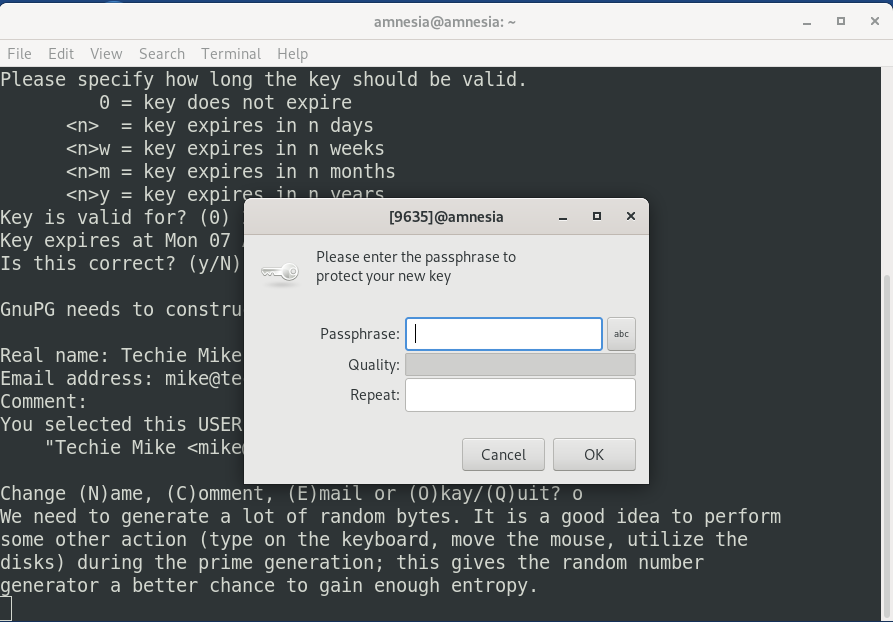
Now it asks you to enter a passphrase to protect your private key. Enter a good and long passphrase and remember it. Because if you forget this passphrase, you won’t be able to unlock you private key.
One advantage of storing your passwords on a persistent volume in TAILS is that they can be written down (all of them except the one to open the persistent volume) Generally, the best passphrase would be truly random, use any of the 94 characters on a standard keyboard, and be at least 36 characters long. If your device is air-gapped and you are going to record your key passphrases, why not create strong ones, something like:
‘1{d+j^SvRxi*4@jhKd-jZdmYw29J7$D][IK(juYT^fd@ahuiRoshb%rts”[.</d5VspU

Once you enter and confirm your passphrase. GPG will generate your keys.
We need to generate a lot of random bytes. It is a good idea to perform
some other action (type on the keyboard, move the mouse, utilize the
disks) during the prime generation; this gives the random number
generator a better chance to gain enough entropy.
It took about 1 minute on my system to generate my key pair.
gpg: key 4F0BDACC marked as ultimately trusted
gpg: directory '/home/matrix/.gnupg/openpgp-revocs.d' created
gpg: revocation certificate stored as '/home/matrix/.gnupg/openpgp-revocs.d/F0461D8F7F64F70A5BBED42E02C87F194F0BDACC.rev'
public and secret key created and signed.

gpg: checking the trustdb
gpg: marginals needed: 3 completes needed: 1 trust model: PGP
gpg: depth: 0 valid: 1 signed: 0 trust: 0-, 0q, 0n, 0m, 0f, 1u
gpg: next trustdb check due at 2018-01-31
pub rsa2048/4F0BDACC 2021-08-07 [S] [expires: 2023-08-07]
Key fingerprint = F046 1D8F 7F64 F70A 5BBE D42E 02C8 7F19 4F0B DACC
uid     [ultimate] Techie Mike <[email protected]>
sub rsa2048/E02A4EED 2023-08-07 [] [expires: 2023-08-07]
This first line tells us that GPG created a unique identifier for public key. This unique identifier is in hex format. When someone wants to download you public key, they can refer to you public key via your email address or this hex value.
The third line tells us that GPG created a revocation certificate and its directory. Your should never share you private key with anyone. If you private key is compromised, you can use revocateion certificate to revoke your key. That means you tell the rest of the world that the old public key shall not be used any more. I suggest that you open this revocation certificate with your text editor to see what’s inside there.
Let’s look at the last three lines. They tell us the public key is 2048 bits using RSA algorithm. The public key ID 4F0BDACC matchs the last 8 bits of key fingerprint. The key fingerprint is a hash of your public key.
It also lists our user ID information: your name and your email address. And it also indicates the subkey which is 2048 bits using RSA algorithm and the unique identifier of the subkey.
Now you can find that there are two files created under ~/.gnupg/private-keys-v1.d/ directory. These two files are binary files with .key extension.
Export Your Public Key
Others need your public key to send encrypted message to you and only your private key can decrypt it. Use the following command to export your public key. --armor option means that the output is ASCII armored. The default is to create the binary OpenPGP format. user-id is your email address.
gpg --armor --export user-id > pubkey.asc
The exported public key is written to pubkey.asc file.
Export Your Private Key
Issue the following command to export your private key.
gpg --export-secret-keys --armor user-id > privkey.asc
The exported key is written to privkey.asc file.
This user has decided to add another key, one for signing, but this does not have to be done. The (CS) + (E) + (S) setup can be done when the user is going to remove the (CS) secret key from the key ring.
Here we used the command: gpg2 –fingerprint
We could have used the command: gpg2 –with-keygrip This command gives a 40-character value which would identify the key on all PGP implementations.
The gpg2 –fingerprint command will show many TAILS keys:
The setup of one (C) master key and several signing subkeys makes sense when you have more than one person on the team who does signing. The master key below will verify all of the signing subkeys whenever they are queried.
The keys we generated in the terminal will appear in the Passwords and Keys application if they are saved.
Generally, you do not want to use one key for everything: CSEA. This may open you up to attack. Many people remove the (C) secret key and make sure it is never exposed to the internet. Think of that certification key as your identity and protect it as such. It can stay valid forever. Your encryption and signing keys are recommended to have a lifetime of 2 years or so. You can change them out, and you can save your old keys in case you need to use them later. If you have files that were encrypted with a particular (E) key, then you will need that private E key to decrypt the data.
That certification key (C) binds itself to your (E) and (S) keys. You only need one (E) and one (S) in most cases. If you start to use multiple (E) and (S) keys, that can cause problems, unless you have multiple users or another good reason to do so. GPG will usually default to using the latest key you created.
(7) Generate revocation certificates.
You want to escrow that certificate, probably on a piece of paper, and store it away from your device in a secure place such as a safe. If you lose your confidential device, you can revoke your keys–no one can assume your identity, generate new sub-keys, or sign the keys of others.
As you can see above, a revocation certificate was generated by default when we made keys by the gpg2 –generate-key method.
(8) Set the preferences for how your keys will function.
That is done in the configuration file.
That’s It! You are ready to use PGP.
You can upload your public key onto a key server if you wish, but remember that once you do it your keys will go to other computers all over the world.


