

Most homelabs start with storage. A NAS here, a media server there. But at some point you realize your services need to talk to each other — and that's when you discover you need something faster than your Postgres instance for session tokens, rate limiting, and job queues.
That's where Redis comes in. And with Redis 8.8 just released, there's a genuinely interesting reason to upgrade: a native Array data type, built by Salvatore Sanfilippo (antirez) himself, plus a window-based rate limiter that eliminates the need for custom Lua scripts.
If you're already running Docker Compose in your homelab — maybe for Proxmox VMs or a media server stack — adding Redis takes about five minutes. Here's everything you need.
What Redis Does (The Short Version)
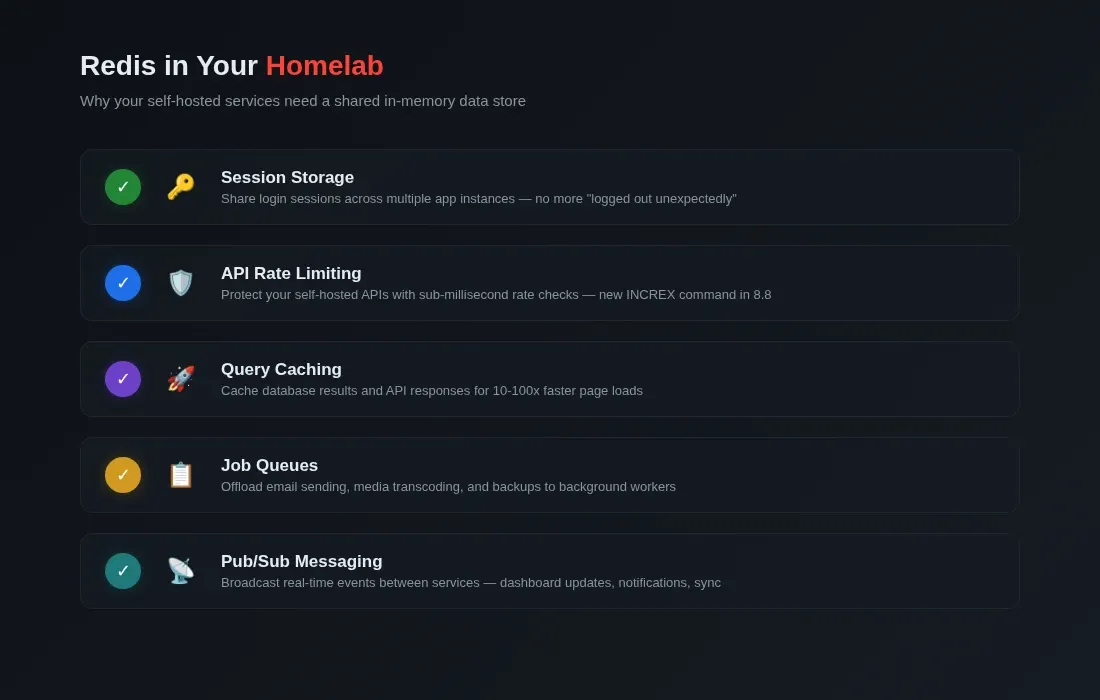
Redis is an in-memory data store. That means it keeps everything in RAM, which makes it extremely fast — we're talking sub-millisecond reads. It's not your primary database (you still need something with disk persistence for that), but it excels at jobs where speed matters more than durability:
- Caching — Store API responses, database query results, or computed values so you don't recalculate them on every request.
- Session storage — Keep user login sessions in a central place that multiple app instances can access.
- Rate limiting — Track how many requests a user or IP has made in a time window.
- Job queues — Push background tasks (sending emails, processing uploads) onto a queue that workers pick up.
- Pub/sub messaging — Broadcast events between services in real time.
Think of it as the fast shared memory your apps use instead of hammering your database or recomputing the same thing over and over.
What's New in Redis 8.8
Redis 8.8.0 shipped as a GA release in late May 2026 (see the official Redis 8.8 release notes). The headline feature is the Array data structure, but there are several other additions worth noting.
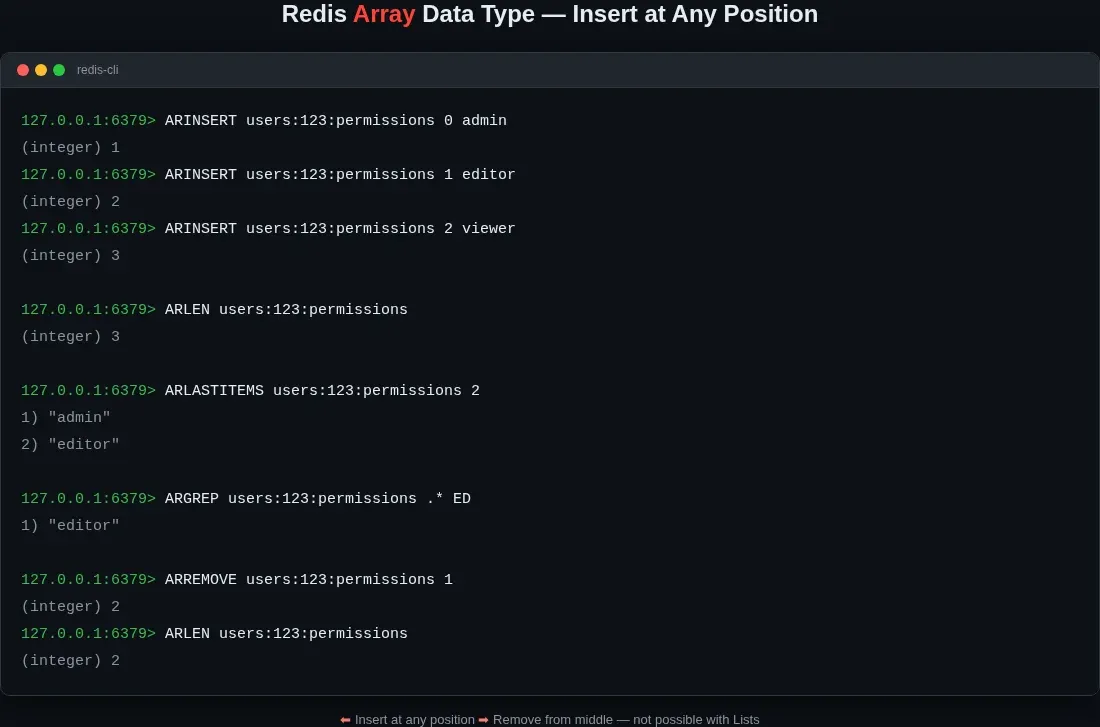
The Array Data Type
This is the big one. Redis has always had lists, sets, sorted sets, hashes, streams — but no native array type. The new ARRAY commands fill that gap:
ARINSERT users:123:permissions role:admin role:editor role:viewer\nARLEN users:123:permissions\nARGREP users:123:permissions 0 -1 EXACT role:editor\nARLASTITEMS users:123:permissions 2\nRedis Arrays are sparse, index-addressable sequences of strings. They support indexed access, range reads, searching, and insertion at specific positions. If you've been using lists and fighting with insertion order, Arrays solve that cleanly.
Window Counter Rate Limiter
Rate limiting in Redis has traditionally meant Lua scripts or the INCR + EXPIRE pattern. Both work, but neither is exactly elegant. Redis 8.8 introduces a built-in window counter that handles window counter rate limiting natively:
INCREX api:ratelimit:user123 BYINT 1 SATURATE LBOUND 0 UBOUND 100 EX 60\nThis tracks requests in a rolling 60-second window and rejects anything over 100. No custom scripts, no race conditions — it's atomic and built into the server.
Other Additions
- Stream improvements — Consumers can now explicitly release pending messages back to the stream without waiting for a timeout. Useful when a worker picks up a message, realizes it can't process it, and wants to hand it back immediately.
- Multi-aggregator TS queries — RedisTimeSeries commands can now run multiple aggregations (avg, min, max, count) in a single query instead of making separate calls.
- Profiling support — New profiling tools for
FT.SEARCHqueries help you spot slow full-text searches.
If you're running an older Redis 7.x instance in your homelab, the jump to 8.8 gives you Arrays, built-in rate limiting, and better stream handling — all worth the upgrade.
Docker Compose Setup
Here's the docker-compose.yml I use. Drop this into a redis directory alongside your other Compose stacks:
\nservices:\n redis:\n image: redis:8.8-alpine\n container_name: redis\n restart: unless-stopped\n ports:\n - "6379:6379"\n volumes:\n - ./redis.conf:/usr/local/etc/redis/redis.conf:ro\n - redis_data:/data\n command: redis-server /usr/local/etc/redis/redis.conf\n healthcheck:\n test: ["CMD", "redis-cli", "ping"]\n interval: 10s\n timeout: 5s\n retries: 3\n networks:\n - redis_net\n\nvolumes:\n redis_data:\n driver: local\n\nnetworks:\n redis_net:\n driver: bridge\nI'm using the Alpine variant (redis:8.8-alpine) because it weighs in at around 30-36 MB compressed — roughly 30% smaller than the Debian-based image. For a homelab where every megabyte of RAM counts, Alpine is the smart default.
A few things to note:
restart: unless-stoppedkeeps Redis running across reboots but won't restart it if you deliberately stop it.- The
redis.confis mounted read-only (:ro). Redis doesn't need to write to its config file — only to the data directory. - The healthcheck uses
redis-cli ping, which returnsPONGif the server is responsive. Docker uses this to track whether the container is healthy. - I'm using a named volume (
redis_data) for persistence. Bind mounts work too, but named volumes are cleaner and Docker manages the permissions for you.
The redis.conf File
Create redis.conf in the same directory as your Compose file:
# Network\nbind 0.0.0.0\nport 6379\nprotected-mode no\n\n# Persistence — RDB snapshots\nsave 900 1\nsave 300 10\nsave 60 10000\n\n# Persistence — AOF (append-only file)\nappendonly yes\nappendfsync everysec\n\n# Memory\nmaxmemory 256mb\nmaxmemory-policy allkeys-lru\n\n# Logging\nloglevel notice\nlogfile ""\n\n# Slow log\nslowlog-log-slower-than 10000\nslowlog-max-len 128\nLet me break down the key settings:
Persistence. Redis can persist data two ways: RDB snapshots (point-in-time dumps) and AOF (append-only file, which logs every write command). I've enabled both. RDB is your periodic backup; AOF is your replay log. Together they give you solid durability without sacrificing speed. appendfsync everysec writes the AOF to disk once per second — a reasonable middle ground.
Memory. I've capped Redis at 256 MB with maxmemory and set the eviction policy to allkeys-lru. This means when Redis hits 256 MB, it evicts the least recently used keys. For a homelab serving multiple apps, 256 MB is plenty for caching and session storage. If you're running heavier workloads — say, storing large JSON blobs — bump this to 512 MB or more. But don't give Redis more RAM than it needs; the OS uses RAM for file caching too.
Slow log. slowlog-log-slower-than 10000 logs any command that takes longer than 10 milliseconds. In a homelab, this helps you spot when a poorly written query or an oversized key is causing latency.
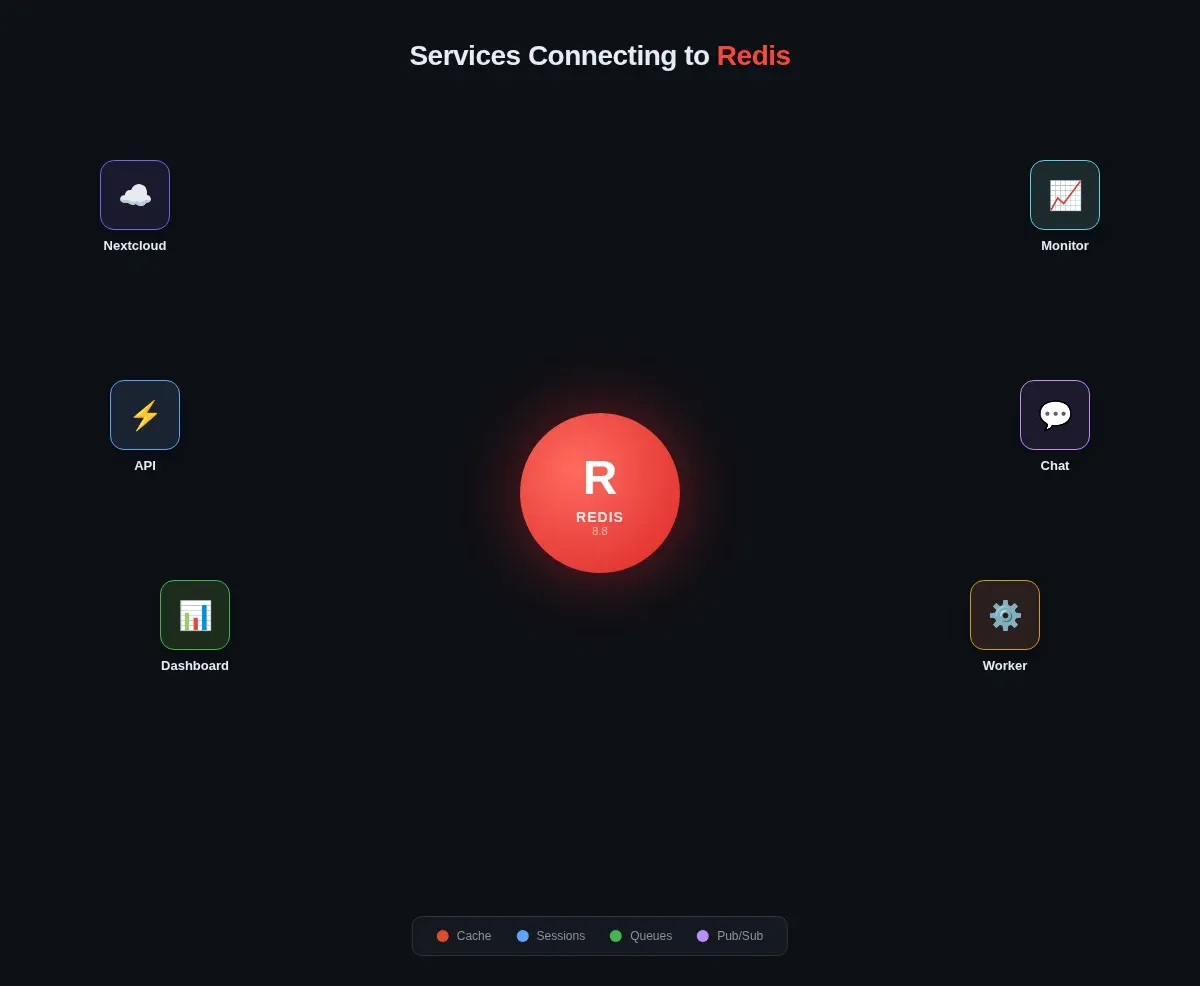
Real Homelab Use Cases
Here's where Redis earns its keep in a self-hosted environment.
Session Storage for Web Apps
If you're running multiple instances of an app behind a reverse proxy — say, two Paperless-ngx containers or a load-balanced Nextcloud — you need a shared session store. Otherwise, when the load balancer sends a user to a different instance, their session is gone and they're logged out.
Most frameworks support Redis as a session backend. In a Laravel app (like the real-time chat app I built), it's one line in .env:
SESSION_DRIVER=redis\nIn a Node.js app with Express, the connect-redis package handles it:
const RedisStore = require("connect-redis").default;\nconst session = require("express-session");\nconst { createClient } = require("redis");\n\nconst redisClient = createClient({ url: "redis://redis:6379" });\nredisClient.connect();\n\napp.use(session({\n store: new RedisStore({ client: redisClient }),\n secret: "your-secret-here",\n resave: false,\n saveUninitialized: false,\n}));\nNow your sessions survive container restarts and work across multiple app instances.
Rate Limiting for Self-Hosted APIs
If you expose any APIs from your homelab — a weather dashboard, a custom status page, a webhook receiver — you probably want rate limiting. Without it, a misconfigured client or a script loop can hammer your server.
Redis 8.8's new window counter makes this trivial:
import redis\n\nr = redis.Redis(host="redis", port=6379, decode_responses=True)\n\ndef check_rate_limit(user_id: str, limit: int = 100, window: int = 60) -> bool:\n key = f"ratelimit:{user_id}"\n count, _ = r.execute_command("INCREX", key, "BYINT", 1, "SATURATE", "LBOUND", 0, "UBOUND", limit, "EX", window)\n return int(count) <= limit\nNo Lua scripts, no race conditions, no separate EXPIRE calls. The window counter handles everything atomically.
Caching Slow Database Queries
Your homelab probably has a Postgres or MariaDB instance doing the heavy lifting. Some queries are fast; some aren't. For the slow ones — dashboard aggregations, reporting queries, complex joins — Redis caching is a straightforward win.
The pattern: check Redis first. If the key exists, return it. If not, query the database, store the result in Redis with a TTL, and return it:
import json\nfrom datetime import timedelta\n\ndef get_dashboard_stats():\n cache_key = "dashboard:stats:weekly"\n cached = r.get(cache_key)\n if cached:\n return json.loads(cached)\n\n # Slow query goes here\n stats = run_expensive_query()\n r.setex(cache_key, timedelta(minutes=15), json.dumps(stats))\n return stats\nA 15-minute TTL means your dashboard stays snappy even with dozens of concurrent users, and the database only sees one query every 15 minutes.
Job Queues
Background jobs are another natural fit. When a user uploads a file that needs processing, you don't want to keep their HTTP connection open while you resize images or transcode video. You push a job onto a Redis-backed queue and a worker picks it up.
In the Node.js ecosystem, BullMQ is the standard choice:
const { Queue, Worker } = require("bullmq");\n\nconst queue = new Queue("image-processing", {\n connection: { host: "redis", port: 6379 }\n});\n\n// Enqueue a job\nawait queue.add("resize", { imageId: 42, width: 800 });\n\n// Worker picks it up\nconst worker = new Worker("image-processing", async (job) => {\n await resizeImage(job.data.imageId, job.data.width);\n}, { connection: { host: "redis", port: 6379 } });\nRedis's list and stream data structures are what make job queues possible — they're ordered, atomic, and blazing fast.
Connecting Your Apps
If your apps run in the same Docker Compose network, they can reach Redis at redis:6379. If they're on the same host but outside Docker, use localhost:6379 (the port mapping in the Compose file handles that).
For Python projects, install redis-py:
pip install redis\nimport redis\nr = redis.Redis(host="localhost", port=6379, decode_responses=True)\nr.ping() # Returns True\nFor Node.js, use ioredis (or redis, the official client — both work):
npm install ioredis\nconst Redis = require("ioredis");\nconst redis = new Redis({ host: "localhost", port: 6379 });\nredis.ping().then(console.log); // "PONG"\nMonitoring: See What's Happening
Redis ships with redis-cli, which you can run inside the container:
docker exec -it redis redis-cli\nA few commands worth knowing:
INFO # Server stats: memory, connections, persistence\nMONITOR # Live stream of every command (careful — noisy)\nSLOWLOG GET 10 # Last 10 slow queries\nDBSIZE # Number of keys in the current database\nMEMORY STATS # Detailed memory breakdown\nFor a graphical view, RedisInsight is a free desktop tool from Redis that connects to your instance and shows key counts, memory usage, and a command profiler. It runs on Windows, macOS, and Linux. If you prefer the terminal, redis-cli gets you 90% of the way there.
Security Note
My redis.conf above sets protected-mode no and bind 0.0.0.0. That's fine on a homelab network behind a firewall, but if Redis is reachable from the internet, you need to lock it down.
The simplest approach: set a password with requirepass in redis.conf:
requirepass your-strong-password-here\nThen connect with:
redis-cli -a your-strong-password-here\nOr use the AUTH command after connecting. For anything public-facing, also consider TLS — Redis supports it natively as of version 6.0, though the configuration is more involved.
Wrap-Up
Redis is one of those services that starts small and grows with your homelab. First it's caching a few API responses. Then it's storing sessions for your web apps. Then it's managing job queues and rate limiting your endpoints. Before long, you wonder how you ran a homelab without it.
Redis 8.8 makes a compelling case for upgrading: the Array data type fills a real gap, the window counter rate limiter simplifies a common pattern, and the stream improvements make job queues more flexible. And with Docker Compose, getting it running takes about as long as copying a YAML file and running docker compose up -d.
The Alpine image is around 30-36 MB, it idles at a few megabytes of RAM, and it'll handle thousands of operations per second without breaking a sweat. For any homelab running more than two or three services, Redis is worth the five minutes it takes to deploy.
check out some of my other homelab posts: