


There's a moment every homelab user hits. You're away from home, staring at a coffee shop Wi-Fi login page, and you need to check your Proxmox dashboard. Or you want to share your Jellyfin server with a friend, but it's behind your ISP's NAT — no public IP, no port forwarding on the router, nothing.
SSH tunnels solve both problems with a single command. You don't always need a VPN or Cloudflare Tunnel — just SSH forwarding when you already have a reachable SSH path. And SSH ships on every Linux box and is available as an optional feature on Windows 11.
Last week, a guide to SSH tunnels hit the Hacker News front page with 377 points. Ivan Velichko's tutorial is excellent — detailed, visual, and backed by a live playground. But it's written for cloud engineers who think in VPCs and bastion hosts. This post is the homelab version: three real problems from my own setup, the exact commands I run, and the reasoning behind each flag.
If you're a Cambridge IGCSE or A-Level CS student, stick around. SSH tunnels map directly to the networking topics on your syllabus — ports, protocols, firewalls, and the client-server model — and seeing them in action makes the theory click.
What You Can Do With SSH Tunnels
Before we get into commands, here's what's on the table:
- Access Proxmox from anywhere — your Proxmox web UI runs on
https://192.168.1.10:8006but you're on a different network. SSH tunnels map that port tolocalhost:8006on your laptop. - Expose Jellyfin through a $5 VPS — your Jellyfin server sits behind NAT with no public IP. A remote tunnel punches through and makes it reachable from the internet.
- Browse securely on untrusted Wi-Fi — a single
-Dflag turns your home server (or VPS) into a SOCKS proxy. All browser traffic routes through an encrypted SSH connection.
Each of these is one ssh command. No extra software. Let's walk through them, starting with the one I use most.
Scenario 1: Access Proxmox From Anywhere (Local Port Forwarding)
My Proxmox box sits on 192.168.1.10 — a private address inside my home network. (If you're new to Proxmox, I wrote about setting up a Proxmox homelab on a mini PC.) From my desk, I just type that into a browser and I'm in. From a coffee shop? It's invisible.
But I have a VPS with a public IP. I can SSH into it. If I can SSH into the VPS, and the VPS can reach my home network (via WireGuard), the VPS becomes a jump host.
Here's the command that makes Proxmox appear on my laptop:
ssh -L 8006:192.168.1.10:8006 mike@my-vps.example.com
Let's break that down flag by flag:
-L— Local port forwarding. "Take a port on my machine and forward it, through the SSH server, to a destination."8006— The port that opens on my laptop. I'll openhttps://localhost:8006in a browser.192.168.1.10:8006— The final destination. Proxmox's IP and port as seen from the VPS.mike@my-vps.example.com— The SSH server we're tunneling through.
The traffic goes: laptop → VPS (encrypted SSH) → Proxmox (plain TCP). The SSH server decrypts the traffic on the VPS and forwards it to Proxmox. Anyone snooping on the coffee shop Wi-Fi sees only an encrypted SSH connection to my-vps.example.com.
Here's what that looks like visually:
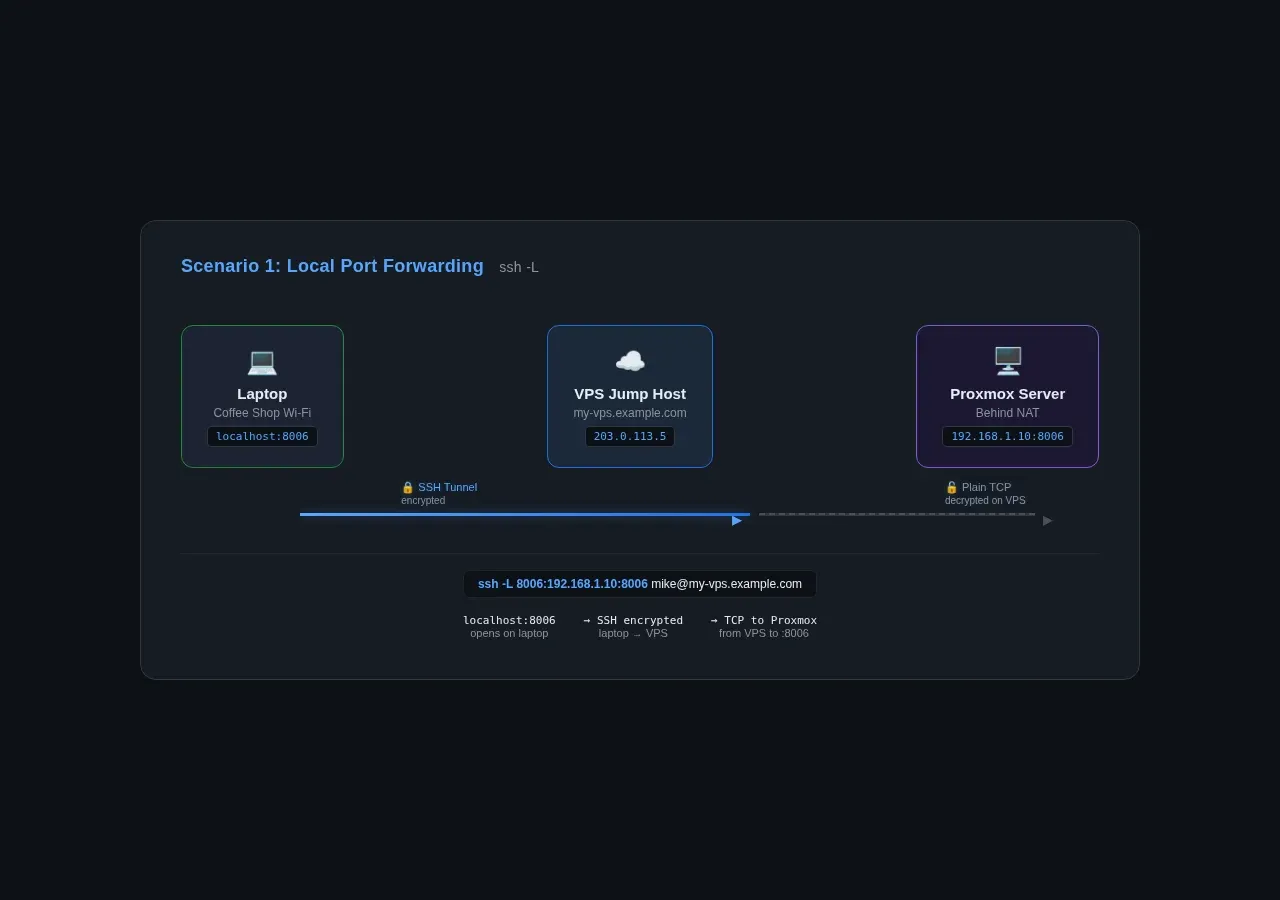
Cambridge tie-in: This is the client-server model in action. Your laptop is the SSH client; the VPS is the SSH server. The Proxmox box is a separate TCP server listening on port 8006. The SSH tunnel doesn't replace any of these — it creates an encrypted channel between two points in the chain.
Adding the Bastion Host
The command above works when the VPS can reach Proxmox directly (e.g., they're on the same WireGuard network). What if Proxmox is reachable only from a specific machine inside your home network?
Use -J (Jump Host):
ssh -L 8006:192.168.1.10:8006 -J mike@my-vps.example.com mike@homeserver.local
This tells SSH: "Connect to my-vps.example.com first, then from there, connect to homeserver.local, and forward local port 8006 to Proxmox on the home network." The traffic goes laptop → VPS → homeserver → Proxmox.
Important: This works only if the VPS can reach homeserver.local — for example, over WireGuard, Tailscale, or an existing reverse SSH tunnel from that home server to the VPS. This kind of VPS-plus-mini-PC architecture is what I run in my minimal homelab setup — a cheap VPS as the public face, a mini PC doing the real work behind NAT. In a typical NAT setup without one of these, the VPS can't resolve or route to a .local hostname. If you're not sure whether the VPS can reach your home server, stick with the single-hop -L command from the previous section (assuming your VPS and Proxmox share a VPN or direct SSH path).
Tip: Add -N to skip opening a shell (tunnel only) and -f to background the process:
ssh -fNL 8006:192.168.1.10:8006 mike@my-vps.example.com
Now Proxmox stays mapped to localhost:8006 in the background until you kill the SSH process.
Security: Bind to localhost Only
By default, -L 8006:192.168.1.10:8006 binds to localhost:8006 — only programs on your laptop can reach it. If you specify -L *:8006:192.168.1.10:8006 or -L 0.0.0.0:8006:..., the port opens on all network interfaces and anyone on the same Wi-Fi can connect to your Proxmox login page. Don't do that.
If you're on a trusted network and genuinely need this (e.g., testing from a phone), use -L 192.168.1.50:8006:... to bind to a specific interface instead of 0.0.0.0.
Scenario 2: Expose Jellyfin Through a VPS (Remote Port Forwarding)
Local port forwarding brings a remote service to you. Remote port forwarding does the reverse — it sends a local service out through the SSH server.
My Jellyfin server runs on my homelab box at localhost:8096. My ISP gives me a dynamic IP behind carrier-grade NAT — there's no way to open port 8096 to the internet from my end. But I can SSH out to my VPS. Remote port forwarding turns that outbound SSH connection into an inbound path for Jellyfin traffic.
ssh -R 8096:localhost:8096 mike@my-vps.example.com
Here's the breakdown:
-R— Remote port forwarding. "Take a port on the remote SSH server and forward it back to my local machine."8096— The port that opens on the VPS.localhost:8096— My Jellyfin server as seen from my homelab machine (the one running this command).
After running this, http://my-vps.example.com:8096 reaches Jellyfin. The traffic goes: visitor → VPS:8096 → SSH tunnel → homelab:8096 (Jellyfin).
Security note: This exposes Jellyfin over plain HTTP on the visitor-to-VPS leg. For real public use, put Nginx or Caddy in front of port 8096 on the VPS and serve it over HTTPS. The SSH tunnel protects traffic between your homelab and the VPS — it does not protect the connection between a visitor's browser and your VPS. A reverse proxy with Let's Encrypt handles that leg.
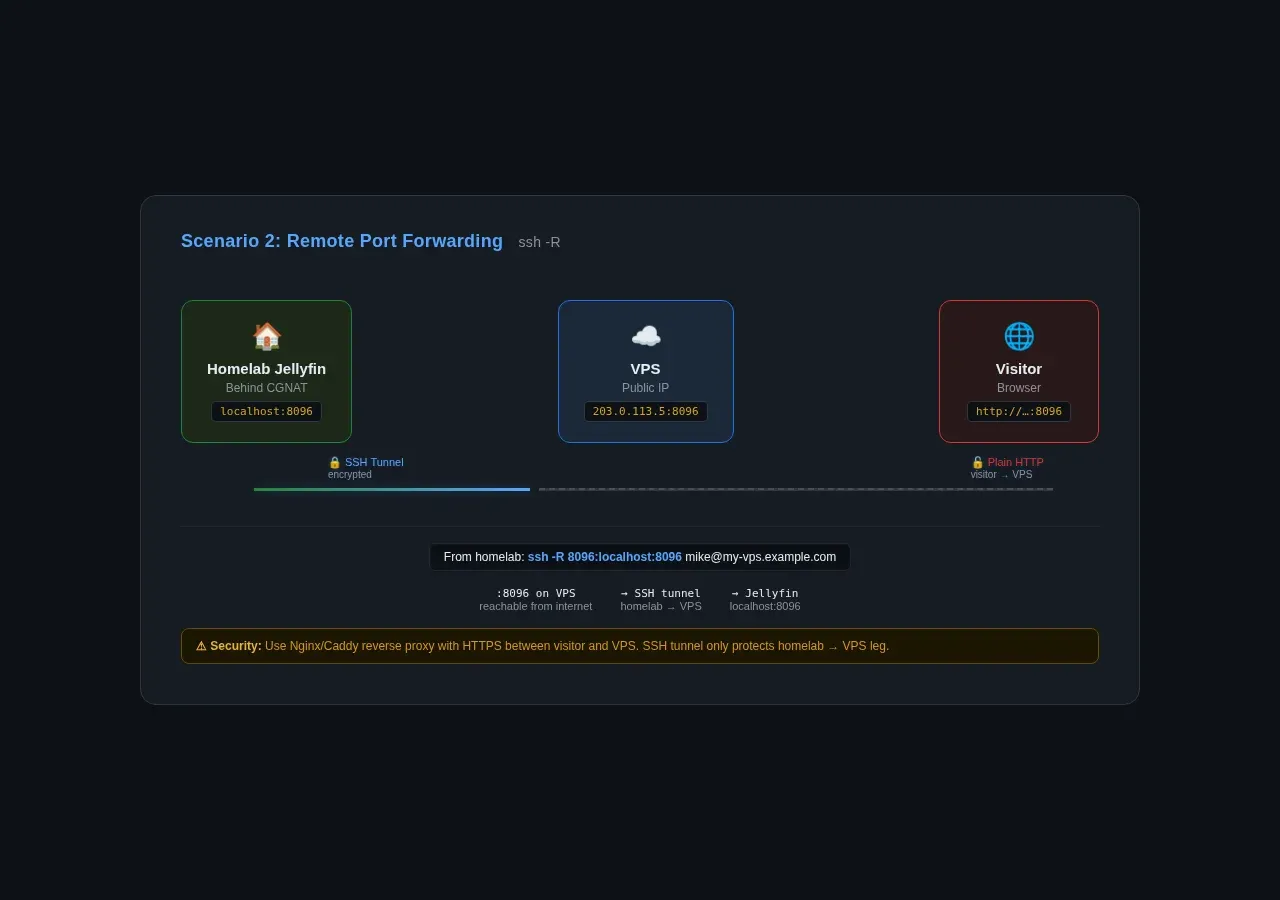
Cambridge tie-in: This is NAT traversal in practice. NAT (Network Address Translation) normally blocks inbound connections — no one from the internet can reach 192.168.x.x. Remote port forwarding works outbound from inside the NAT, so the firewall sees it as an outgoing SSH connection (allowed) and the tunnel carries the reverse traffic inside it.
The GatewayPorts Setting
Here's the catch: by default, the SSH server binds remote-forwarded ports to localhost only. That means port 8096 on the VPS is reachable from the VPS itself but not from the internet. To make it public, set GatewayPorts clientspecified in /etc/ssh/sshd_config on the VPS:
GatewayPorts clientspecified
Then restart the SSH server:
sudo systemctl restart ssh
# or, on some distros: sudo systemctl restart sshd
With GatewayPorts clientspecified, the client can request a public bind by prefixing the remote port with *::
ssh -R '*:8096:localhost:8096' mike@my-vps.example.com
Without the *: prefix, the bind behaviour depends on the server config — it may default to localhost-only even with GatewayPorts clientspecified. Using *: makes the intent explicit. If you want every remote-forwarded port to bind publicly by default (less safe), use GatewayPorts yes. I recommend clientspecified — it lets you decide per-tunnel.
Security note: When you bind a remote-forwarded port to a public interface (via GatewayPorts yes or *:), anyone who can reach your VPS on port 8096 can reach your Jellyfin server. Mitigate this with:
- Jellyfin's built-in auth — require a username and password
- UFW on the VPS — limit which IPs can hit port 8096:
bash sudo ufw allow from 203.0.113.0/24 to any port 8096 - Use a high random port instead of 8096 —
-R 28491:localhost:8096to reduce casual noise, but do not treat this as security. Anyone scanning your VPS will find any open port. - SSH key-only auth on the VPS — no password login on the SSH server your tunnel connects through
For more on homelab security beyond tunnels, I looked at Cloudflare's self-managed OAuth and how it changes what you can safely expose — worth a read if you're putting services on the public internet.
Scenario 3: Secure Browsing on Untrusted Wi-Fi (Dynamic Port Forwarding)
Coffee shop, airport, hotel — untrusted networks where anyone with Wireshark can see your DNS queries and unencrypted HTTP traffic. HTTPS still exposes some metadata, and in many cases the domain name can be visible through DNS or SNI unless encrypted DNS/ECH is in use.
A dynamic SSH tunnel turns your home machine (or VPS) into a SOCKS proxy. Browser traffic configured to use the SOCKS proxy routes through the encrypted SSH connection, exits from a trusted network.
ssh -D 1080 mike@my-vps.example.com
That's it. One flag:
-D 1080— Dynamic port forwarding. Opens a SOCKS5 proxy onlocalhost:1080.
Use -R '*:8096:localhost:8096' only if this service is intended to bind publicly. Keep -R 8096:localhost:8096 for VPS-local-only access behind Nginx/Caddy.
Now configure your browser. In Firefox: Settings → Network Settings → Manual proxy configuration → SOCKS Host: localhost, Port: 1080, SOCKS v5. Check "Proxy DNS when using SOCKS v5" — this routes DNS queries through the tunnel too, preventing DNS leaks.
All your browser traffic now exits from the VPS. To anyone on the coffee shop Wi-Fi, it's just encrypted SSH to my-vps.example.com.
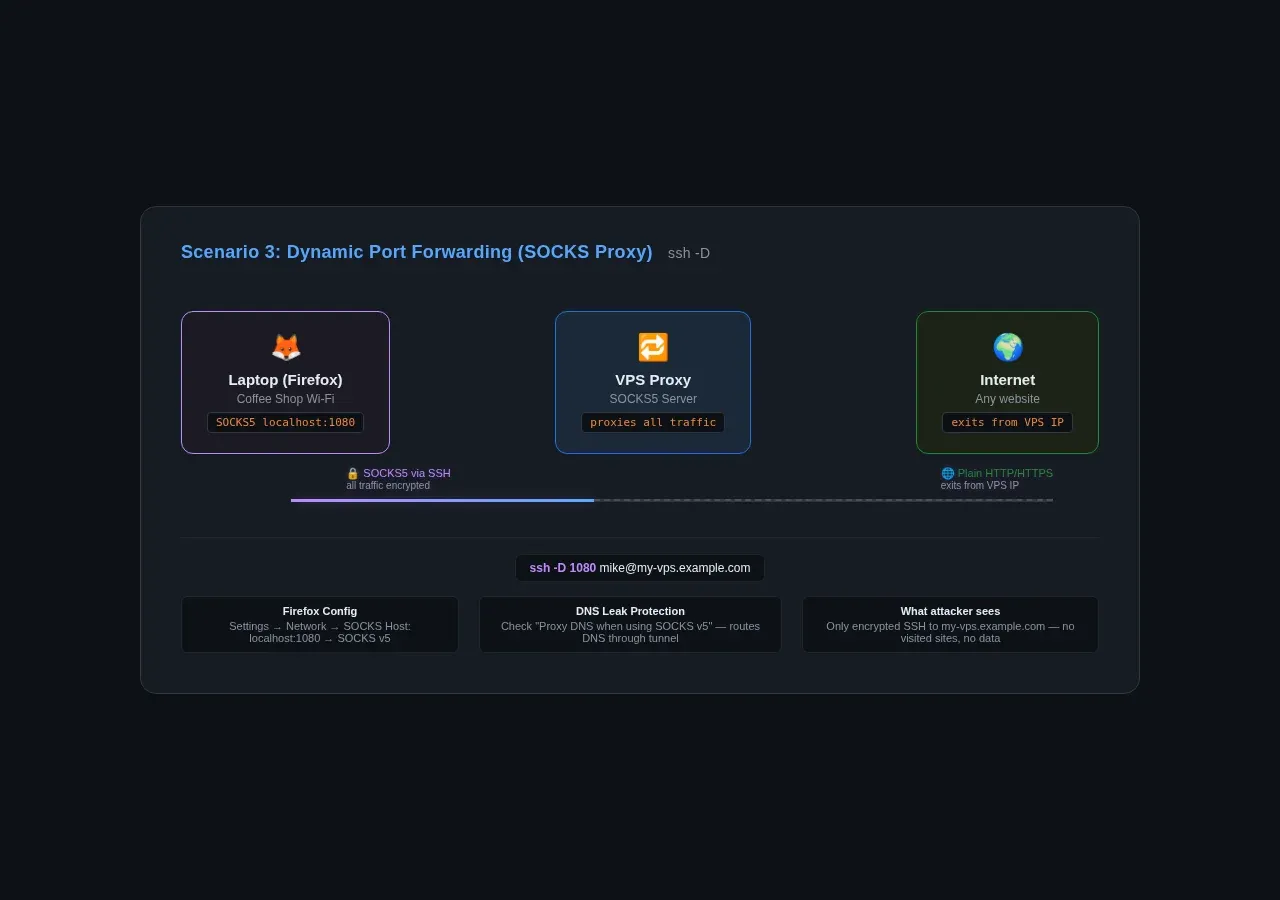
Cambridge tie-in: This demonstrates transport-layer security. SSH runs over TCP and creates an encrypted tunnel for application traffic — your browser's HTTP requests, DNS queries, everything. The SOCKS5 proxy operates at the application layer — Firefox talks SOCKS to localhost:1080, and SSH wraps that in encrypted TCP segments. A protocol stack in practice: application → transport → network → link.
Use Your Home Server Instead of a VPS
If you don't have a VPS, you can use your home server — but it must be reachable from where you are:
ssh -D 1080 mike@homeserver.local
This requires your home server to be reachable from wherever you are — by public IP, VPN, Tailscale, or an existing SSH connection. Same effect: your browsing traffic exits from your home IP. Helpful when a website geo-blocks you or when you want your traffic to appear from a different location.
The Three Flags: A Cheat Sheet
If you remember nothing else, remember this table:
| Flag | Name | What It Does | Mnemonic |
|---|---|---|---|
-L |
Local | Remote service → local port | Local = brings it to Localhost |
-R |
Remote | Local service → remote port | Remote = opens on Remote server |
-D |
Dynamic | SOCKS proxy on local port | Dynamic = any destination |
The port order is always consistent: local_port:destination_host:destination_port for -L, and remote_port:local_host:local_port for -R. The first number is always the port you're opening; the rest is where traffic goes.
Making Tunnels Survive Disconnections
SSH tunnels drop when the connection drops — flaky Wi-Fi, laptop sleep, ISP hiccups. Here are three ways to make them resilient:
autossh (Recommended)
autossh monitors the SSH connection and restarts it when it fails:
autossh -M 0 -fNL 8006:192.168.1.10:8006 mike@my-vps.example.com
The -M 0 disables the built-in monitoring port (autossh uses the SSH connection itself instead). -f backgrounds it. Install with sudo apt install autossh or brew install autossh.
systemd Service
For tunnels that should always be running (like the Jellyfin remote forward), a systemd service is the most reliable option:
[Unit]
Description=SSH Remote Tunnel for Jellyfin
After=network-online.target
Wants=network-online.target

[Service]
ExecStart=/usr/bin/ssh -NT -o ServerAliveInterval=60 -o ExitOnForwardFailure=yes -R 8096:localhost:8096 mike@my-vps.example.com
Restart=always
RestartSec=30
User=mike

[Install]
WantedBy=multi-user.target
Save this as /etc/systemd/system/ssh-tunnel-jellyfin.service, then:
sudo systemctl daemon-reload
sudo systemctl enable --now ssh-tunnel-jellyfin.service
Key options:
- `ServerAliveInterval=60` — sends a keepalive every 60 seconds
- `ExitOnForwardFailure=yes` — exits immediately if the remote port is already in use
- `Restart=always` — if the connection dies, systemd brings it back after 30 seconds
SSH Config for Keepalive
If you don't want autossh or systemd, add keepalive settings to ~/.ssh/config:
Host my-vps
    HostName my-vps.example.com
    User mike
    ServerAliveInterval 60
    ServerAliveCountMax 3
This sends a keepalive every 60 seconds and disconnects after 3 failed probes (3 minutes). For all hosts, use Host * instead.
Summary
SSH tunnels are one of those rare tools that solve three completely different problems with the same protocol:
ssh -L— Bring a remote service to you. Proxmox, databases, Docker registries — if a machine you can SSH into can reach it, you can reach it.ssh -R— Send a local service out. Jellyfin, development servers, anything behind NAT — if you can SSH out, you can expose in.ssh -D— Browse through an encrypted tunnel. One command, a SOCKS proxy, and your coffee shop traffic is as private as your home network.
For single-service port forwarding, you don't always need Tailscale or Cloudflare Tunnel. You need an SSH client, an SSH server, and one of three flags. Everything else is just remembering which flag does what — and now you have the cheat sheet.
If you're a Cambridge CS student working through the 0417 networking syllabus, here's what you just saw in practice: ports (the numbers after the colon in every command), protocols (SSH encrypting TCP traffic, HTTP at the application layer), firewalls (NAT blocking inbound but allowing outbound), and the client-server model (your machine as the SSH client, the VPS as the SSH server, Proxmox/Jellyfin as additional TCP servers). Theory on paper. Practice on a terminal.
