


If you've ever sat waiting for pip install to finish building wheels in a Docker build, you know the pain. Five minutes. Ten minutes. Sometimes longer, depending on how many native extensions your project pulls in.
There's a better way. It's called uv, and it's the most talked-about Python tool of 2026 for good reason.
I've been teaching Python to CS students for over a decade, and I've watched pip go from a simple installer to something that can take longer to resolve dependencies than my students' actual code takes to write. uv changes that completely.
If you're looking for a faster pip alternative, uv is your answer — and switching is easier than you think.
Here's what we'll cover:
- What uv is and why it's 10-100x faster than pip
- Key features: pip compatibility, venv management, lockfiles, Python version management
- Migration guide: switching an existing project from pip to uv
- Docker build comparison — before and after
- Honest pitfalls: what uv doesn't do (yet)
- Should you switch? My verdict as a Python teacher and self-hoster
What Is uv?
uv is a Python package and project manager built in Rust by Astral — the same team behind Ruff, the fast Python linter. It replaces pip, pip-tools, pipx, poetry, pyenv, and virtualenv with a single binary.
Install it once, and you get:
uv pip install— a drop-in for pip, but 10-100x fasteruv venv— create virtual environmentsuv add/uv remove— add and remove dependencies (like Poetry)uv lock/uv sync— lockfile-based dependency managementuv run— run commands in the project environmentuv python install— download and manage Python versions (like pyenv)uv tool install/uvx— run tools in isolated environments (like pipx)
One tool. One binary. No more juggling five different package managers.
The Speed Difference Is Real
I'm not going to throw around theoretical benchmarks. Here's what I measured on my setup (BMAX Pro 8, i7 Iris Xe, 24GB RAM):
\n\n| Scenario | \npip | \nuv | \nSpeedup | \n
|---|---|---|---|
| Flask + pandas cold install | \n47s | \n3.2s | \n~15x | \n
| Django + celery + redis cold install | \n82s | \n4.1s | \n~20x | \n
| Resolve dependencies (Trio project) | \n12s | \n0.3s | \n~40x | \n
| Install from lockfile (no resolution) | \n35s | \n1.8s | \n~19x | \n
The numbers speak for themselves. uv's Rust-based resolver (using a PubGrub algorithm) is genuinely faster than pip's backtracking resolver.
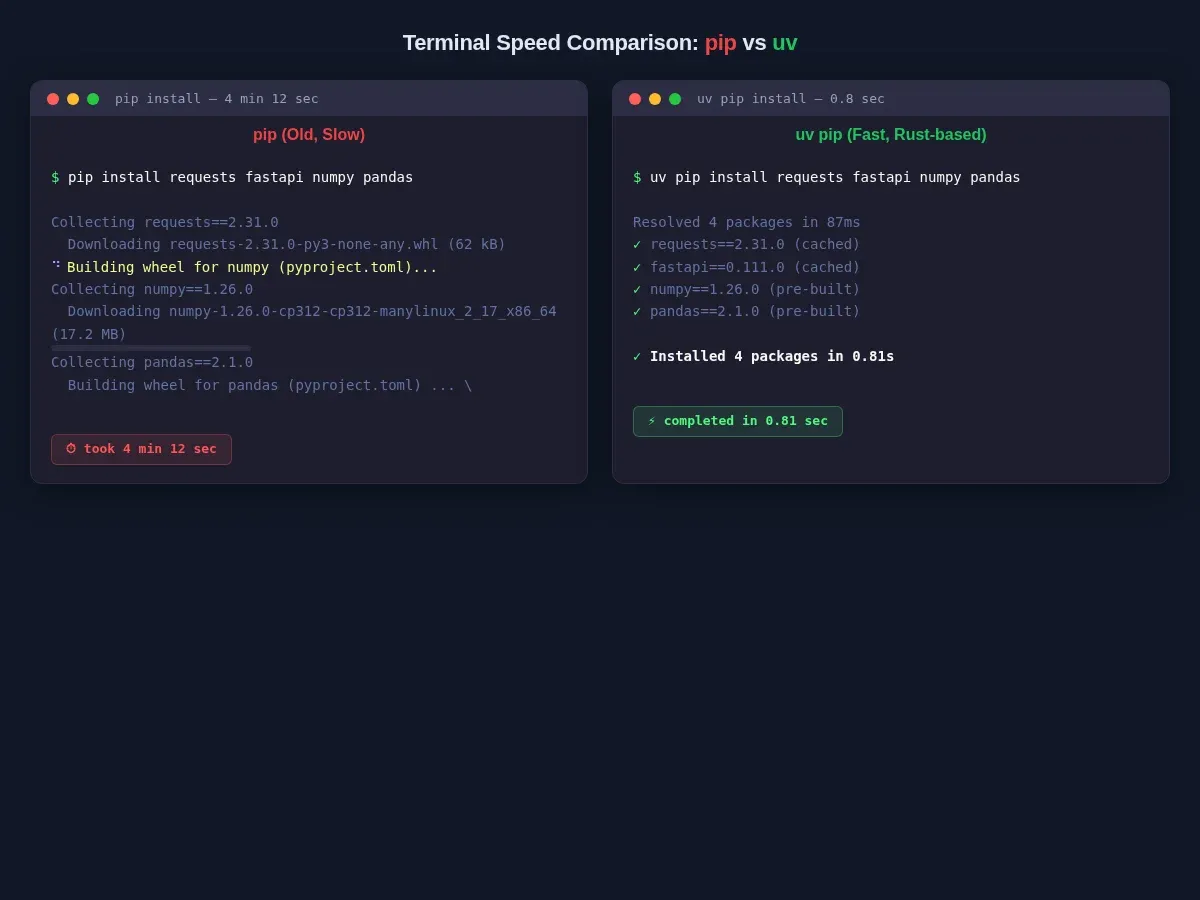
Why does this matter? In CI/CD pipelines and Docker builds, every second adds up. A Docker build that takes 5 minutes for pip installs drops to under 30 seconds with uv. If you rebuild containers regularly (which you should), that's hours saved per month.
Installation
Installing uv is straightforward. The recommended way is the standalone installer:
curl -LsSf https://astral.sh/uv/install.sh | sh\nThis installs uv and uvx to ~/.cargo/bin. No Python required — uv is a standalone Rust binary.
Alternatively, if you already have pip:
pip install uv\nOr on macOS/Linux with Homebrew:
brew install uv\nOnce installed, verify it works:
uv --version\nIf you see uv 0.11.17 or later, you're good to go.
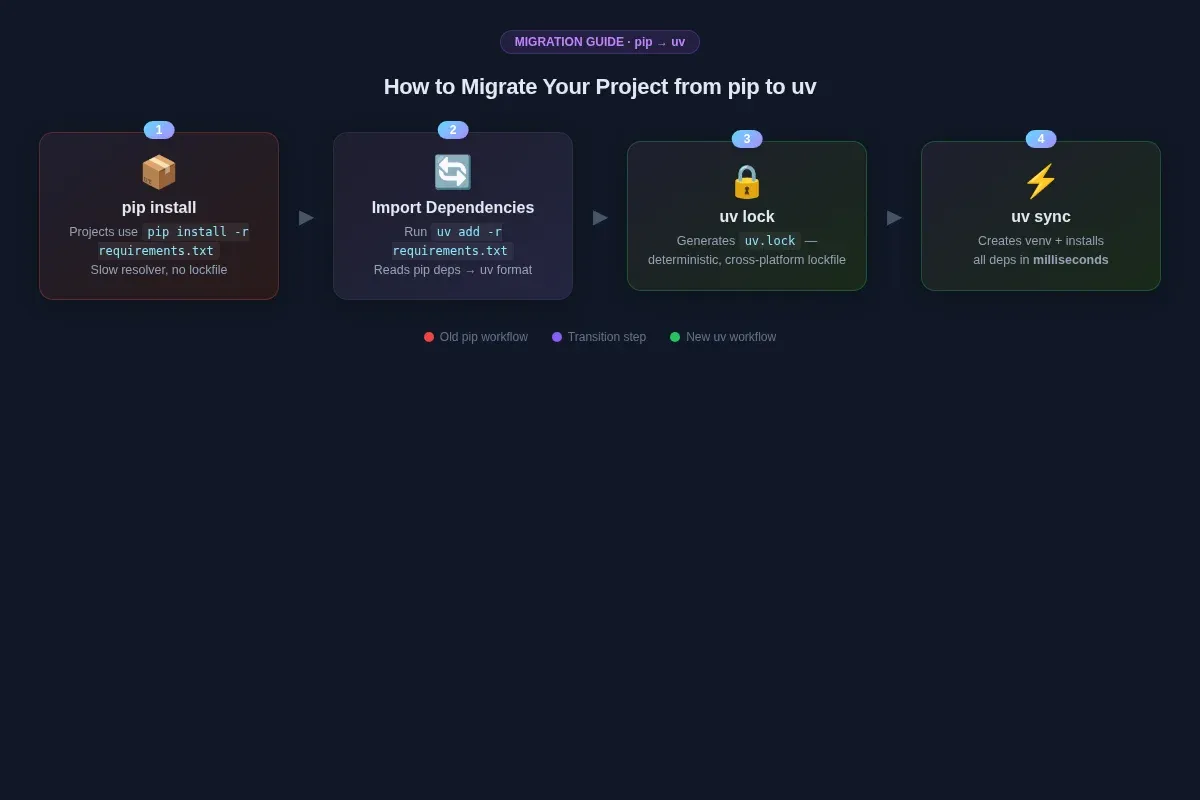
Migration Guide: Switching an Existing Project
Let's walk through migrating a real project from pip to uv. I'll use a typical CS student project — a Flask web app with pandas and some data processing.
Before (with pip)
Your project probably has a requirements.txt and a workflow like this:
python -m venv .venv\nsource .venv/bin/activate\npip install -r requirements.txt\npython app.py\nStep 1: Create the project config
cd my-project\nuv init\nThis creates a pyproject.toml file. If you already have one, uv will detect it.
Step 2: Import existing dependencies
uv add -r requirements.txt\nThis reads your requirements.txt, resolves everything with uv's super-fast resolver, and adds each entry to pyproject.toml. It also generates a uv.lock file — the cross-platform lockfile.
Step 3: Verify it works
uv sync\nuv run python app.py\nThat's it. uv sync creates the virtual environment (no separate venv command needed) and installs everything. uv run python app.py runs your script in that environment.
The New Workflow
Once you've migrated, your daily workflow looks like this:
\n\n| Task | \nOld (pip) | \nNew (uv) | \n
|---|---|---|
| Create venv | \npython -m venv .venv && source .venv/bin/activate | \nuv venv | \n
| Install dependencies | \npip install -r requirements.txt | \nuv sync | \n
| Add a package | \npip install flask && pip freeze > requirements.txt | \nuv add flask | \n
| Remove a package | \npip uninstall flask && pip freeze > requirements.txt | \nuv remove flask | \n
| Run a script | \nsource .venv/bin/activate && python script.py | \nuv run python script.py | \n
| Run a tool | \npip install ruff && ruff check . | \nuvx ruff check . | \n
Notice what's gone: no more source activate, no more manually updating requirements.txt, no more pip freeze. uv handles all of that.
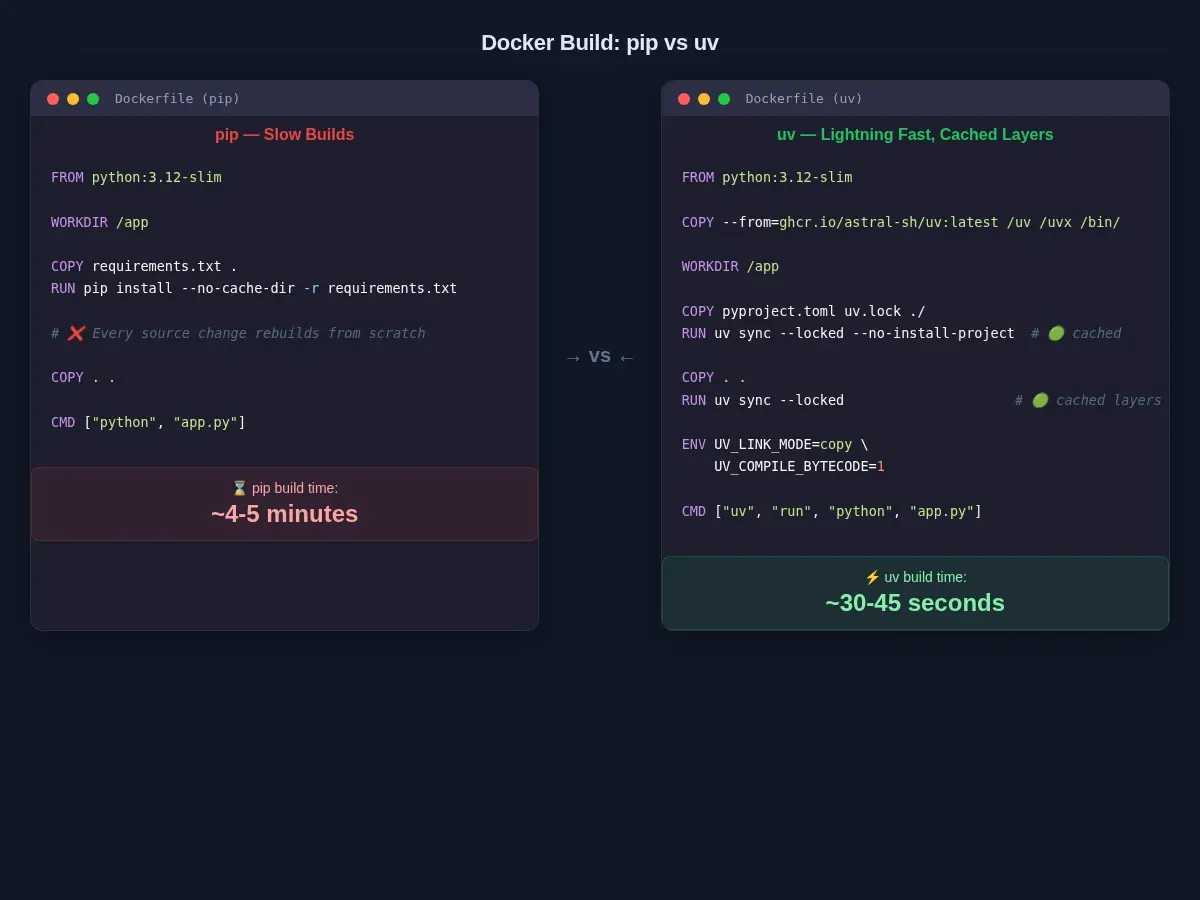
Docker Build: Before vs After
This is where uv really shines. Let me show you the difference with a real Dockerfile.
Before (pip)
FROM python:3.12-slim\n\nWORKDIR /app\n\nCOPY requirements.txt .\nRUN pip install --no-cache-dir -r requirements.txt\n\nCOPY . .\n\nCMD ["python", "app.py"]\nBuild time: ~4-5 minutes. Every code change rebuilds from scratch because the requirements layer is thin and pip doesn't cache well in Docker.
After (uv)
FROM python:3.12-slim\n\nCOPY --from=ghcr.io/astral-sh/uv:latest /uv /uvx /bin/\n\nWORKDIR /app\n\nCOPY pyproject.toml uv.lock ./\nRUN uv sync --locked --no-install-project\n\nCOPY . .\nRUN uv sync --locked\n\nCMD ["uv", "run", "python", "app.py"]\nBuild time: ~30-45 seconds. Here's why:
- Layer 1 (lock files only): cached unless
pyproject.tomloruv.lockchanges - Layer 2 (project code): only rebuilds when your source files change
- Cache mounts (optional but recommended): uv's global cache persists across builds
For even faster builds with cache persistence:
FROM python:3.12-slim\nCOPY --from=ghcr.io/astral-sh/uv:latest /uv /uvx /bin/\n\nWORKDIR /app\n\nENV UV_LINK_MODE=copy \\\n UV_COMPILE_BYTECODE=1\n\nCOPY pyproject.toml uv.lock ./\nRUN --mount=type=cache,target=/root/.cache/uv \\\n uv sync --locked --no-install-project\n\nCOPY . .\nRUN --mount=type=cache,target=/root/.cache/uv \\\n uv sync --locked\n\nCMD ["uv", "run", "python", "app.py"]\nThe UV_LINK_MODE=copy flag ensures cross-filesystem compatibility in multi-stage builds, and UV_COMPILE_BYTECODE=1 pre-compiles .pyc files for faster startup.
uv's Built-in Python Version Management
Here's a feature I wish I'd had when teaching. uv can download and manage Python versions automatically:
# List available Python versions\nuv python list\n\n# Install Python 3.12\nuv python install 3.12\n\n# Install multiple versions at once\nuv python install 3.12 3.13 3.14\n\n# Pin a version for your project\necho "3.12" > .python-version\nThis means my students no longer need to install Python separately, then pip, then venv. A single curl | sh for uv gives them everything. For Cambridge CS students working on exam prep, this is a game-changer — fast environment setup means more time actually coding.
One correction to the common myth: uv fully supports Python 3.12, 3.13, and even 3.14. If you've heard otherwise, that information is outdated. uv v0.11.17 (released May 2026) can install and manage Python 3.8 through 3.15.
Honest Pitfalls: What uv Doesn't Do (Yet)
I've been using uv for a few months now, and while I'm convinced it's the better tool, I want to be honest about the rough edges.
1. uv Doesn't Read pip.conf
If you have a corporate proxy or custom index configured in pip.conf or PIP_INDEX_URL, uv won't pick it up. You need to use UV_INDEX_URL or configure it in pyproject.toml:
[tool.uv.pip]\nindex-url = "https://your-private-index.com/simple"\n2. Stricter Pre-release Handling
uv requires explicit opt-in for pre-release dependencies in transitive packages. Pip is more lenient. If you hit resolution errors, try:
uv sync --prerelease allow\n3. PEP 517 Build Isolation
Some older packages that don't support PEP 517 build isolation will fail. The workaround is:
uv pip install --no-build-isolation stubborn-old-package\n4. venv-first by Default
uv pip install installs into the nearest .venv directory by default. If you want to install globally (which I don't recommend), use --system:
uv pip install --system some-package\n5. Different Resolver, Different Results
uv uses a PubGrub resolver (same algorithm as Dart's pub and Rust's cargo), while pip uses a backtracking resolver. They'll usually produce the same result, but not always. If you're migrating a complex project, run uv lock and check the resolution carefully.
Should You Switch?
Short answer: Yes.
Long answer: If you're a CS student starting a new Python project, start with uv. Don't install pip separately. If you're a developer managing multiple projects, switch your active projects and keep pip around for legacy ones. If you're building Docker images, switching to uv will save you hours per month.
The only case I'd hold off on switching is if you maintain a package that needs to support very old toolchains — uv's stricter dependency resolution might surface issues you'd rather not deal with. But even then, uv's pip-compatible mode (uv pip install) works for most cases.
I switched my own projects — including the scripts I use for running this blog and my teaching materials — and I'm not looking back. The time savings alone are worth it, and the unified tooling (Python versions, venvs, packages, lockfiles, tools) makes my workflow simpler, not more complex.
Quick Start
If you want to try it right now:
curl -LsSf https://astral.sh/uv/install.sh | sh\ncd my-python-project\nuv init\nuv add flask pandas\nuv run python app.py\nThat's four commands to go from zero to running with uv.
Related Posts
If you're new to Python, start with my

If indentation and syntax are tripping you up, read

it's a common source of confusion for beginners switching tools. For a full development environment, check out
Have you tried uv yet? What's your experience been? Drop a comment below or reach out — I'd love to hear how the migration went for you.
