
My homelab started flat. One subnet. Every device — the Proxmox host, the Docker containers, the media server, the WiFi light bulbs — all splashing around in the same 192.168.1.0/24 pool. It worked. Until it didn't.
The moment things shifted was when I set up a second physical node. I had the BMAX Pro 8 running Proxmox as my main workhorse, and the CHUWI MiniBook X joined the rack as a secondary compute node. Suddenly I had services that needed to talk to each other across machines, services that should never see each other, and a growing list of Docker networks that had no business being on the same broadcast domain as my workstation.
Flat networks are the path of least resistance. And for a homelab running a single project, they're the correct design. Don't over-engineer before you need to. But once you cross the threshold with multiple physical nodes, tenant-like isolation between services, or anything internet-facing sharing a wire with your NAS, the flat design stops being simple and starts being a liability.
This is the network design I landed on — why each decision matters, and the configs that hold it together.
The Flat Network Trap
Before the refactor, my layout looked like this:
ISP router (192.168.1.1)
  └── unmanaged switch
        ├── BMAX Pro 8 (Proxmox host, 192.168.1.50)
        │     ├── Docker containers (bridge network, 172.17.0.0/16)
        │     └── VMs (bridged, all on 192.168.1.0/24)
        ├── CHUWI MiniBook X (secondary, 192.168.1.51)
        ├── NAS (192.168.1.30)
        └── Workstation (192.168.1.10)
Everything reachable from everything. Docker containers on the default bridge network. VMs bridged directly to the LAN. Broadcast traffic and service discovery noise had nowhere else to go.
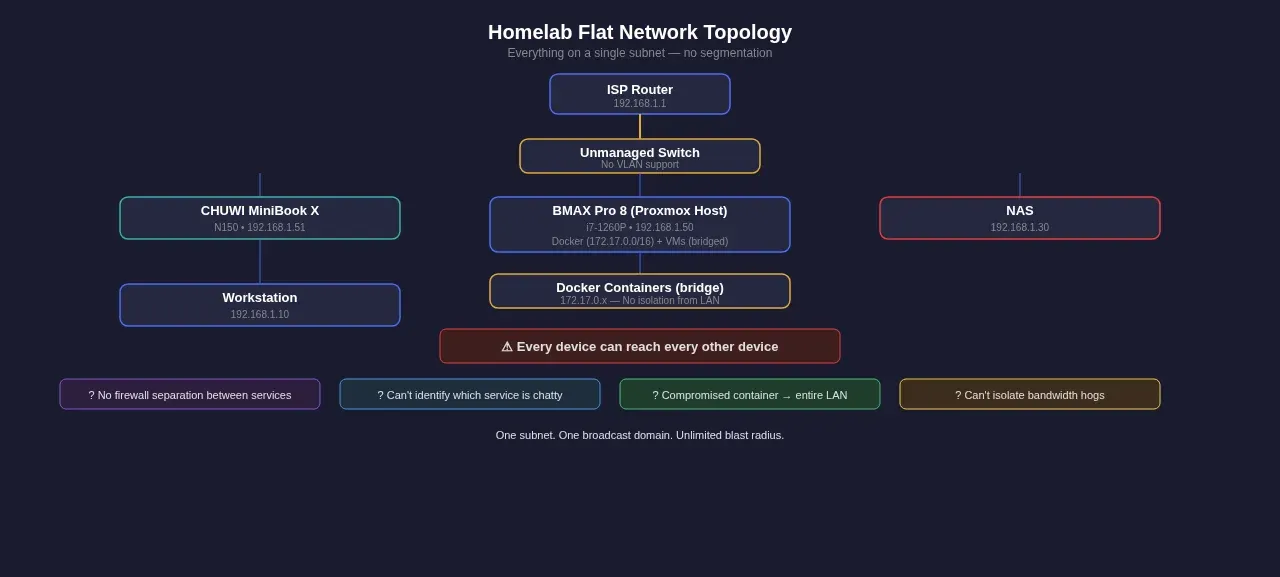
That design can't answer three questions:
- How do you write different firewall rules for Home Assistant and Jellyfin when they share an IP range?
- If someone compromises a container, what stops them from scanning every device on your LAN?
- When something is saturating the network, which service is it?
The operational tell is the last one. When "what's chatty on the wire right now?" becomes a question you can't answer from a switchport counter, the design has outgrown its problem.
Enterprise networks solved this decades ago with segmentation. The same patterns scale down.
Think Miniature Data Centre, Not Home Network
Commercial data centres isolate workloads into dedicated network segments. Each gets its own VLAN, its own subnet, its own firewall posture, its own blast radius. When something goes wrong in one segment, the fault is bounded. When a service needs a different security posture, it gets one without dragging the rest of the rack along.
That's the model. Scaled down to a homelab, it looks like this:
Every project gets: - Its own VLAN - Its own subnet - Explicit firewall rules at the routing boundary - No default trust with any other VLAN
The hypervisor stays on a management network. Workloads live on their own segments. Ops access is explicit. No implicit reachability just because you're on the same switch.
This isn't over-engineering. It's the difference between a network that tolerates growth and one that needs to be torn down and rebuilt every time you add a service.
The Physical Layer
The physical topology constrains the logical design. Here's what's actually plugged in:
My setup:
| Device | Role | Interface |
|---|---|---|
| BMAX Pro 8 (i7-1260P) | Primary Proxmox host | 2× 2.5Gb Ethernet |
| CHUWI MiniBook X (N150) | Secondary node / portable | 1× USB-C Ethernet dongle |
| TP-Link TL-SG108E | Managed switch (8-port, VLAN-capable) | — |
| ISP Router | DHCP + internet gateway | 1× 1Gb |
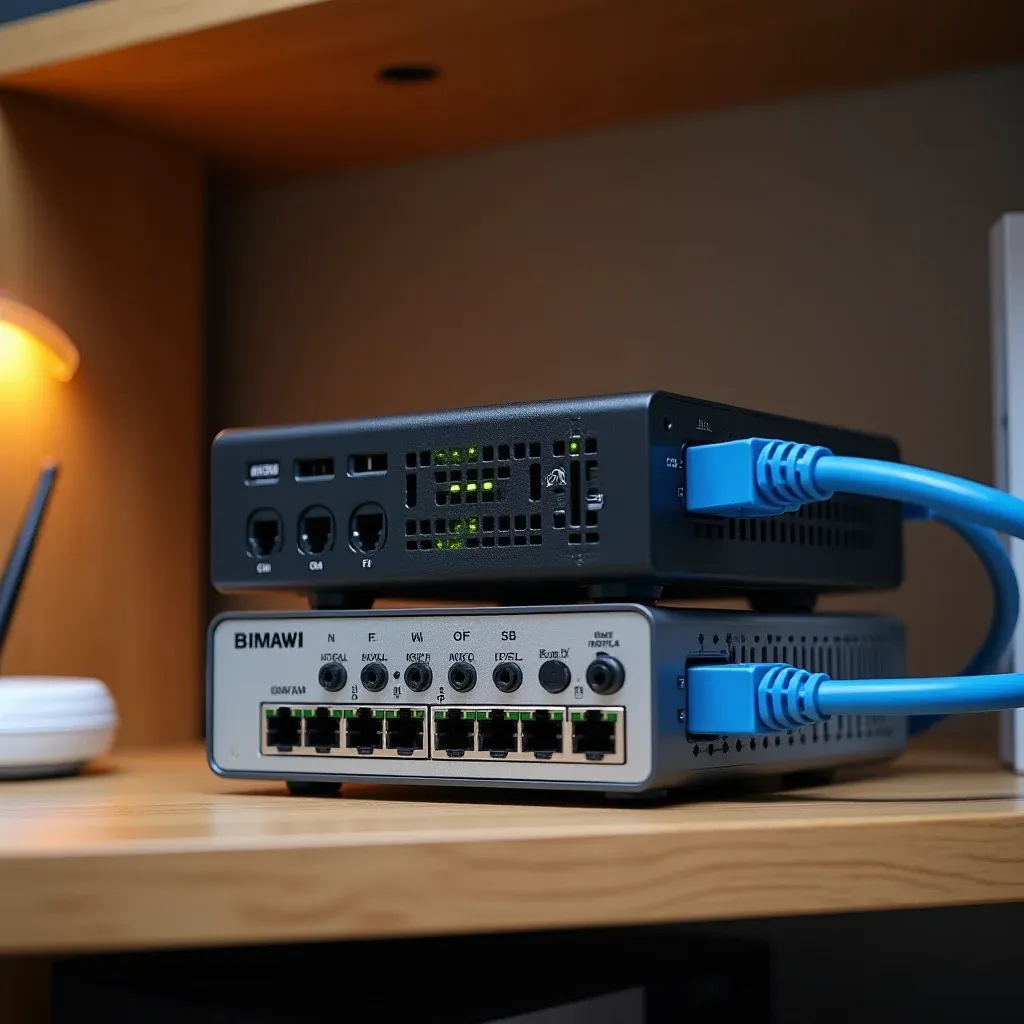
The key piece is the managed switch. An unmanaged switch cannot create or manage VLAN membership. Some may pass tagged frames through, but they cannot assign access ports, define trunks, or enforce segmentation. If you want network segmentation, you need a switch that understands 802.1Q VLAN tagging. You don't need a Cisco Nexus. An entry-level TP-Link or Netgear managed switch with VLAN support is enough to get started. I use the BMAX Pro 8 for most services and the CHUWI MiniBook X as a secondary Proxmox node for lighter workloads.
The ISP router stays as the internet gateway but does not handle inter-VLAN routing. A router, firewall VM, or L3 switch has to do that job. With an entry-level L2 managed switch like the TL-SG108E, VLANs give you separation, but routing between them still needs something like OPNsense, pfSense, or a router that supports VLAN interfaces.
VLANs and Network Segmentation
The logical layout:
VLAN 1  (Management):  192.168.1.0/24    — Proxmox host, switch management, workstation
VLAN 10 (Services):    10.0.10.0/24      — Docker hosts, web services, reverse proxy
VLAN 20 (Media):       10.0.20.0/24      — Jellyfin, NAS, media-related containers
VLAN 30 (IoT):         10.0.30.0/24      — Home Assistant, ESPHome devices, Zigbee bridge
VLAN 40 (Lab):         10.0.40.0/24      — Throwaway VMs, pen-test targets, experiments
The exact VLAN numbers do not matter — consistency and documentation matter more than copying someone else's numbering scheme.
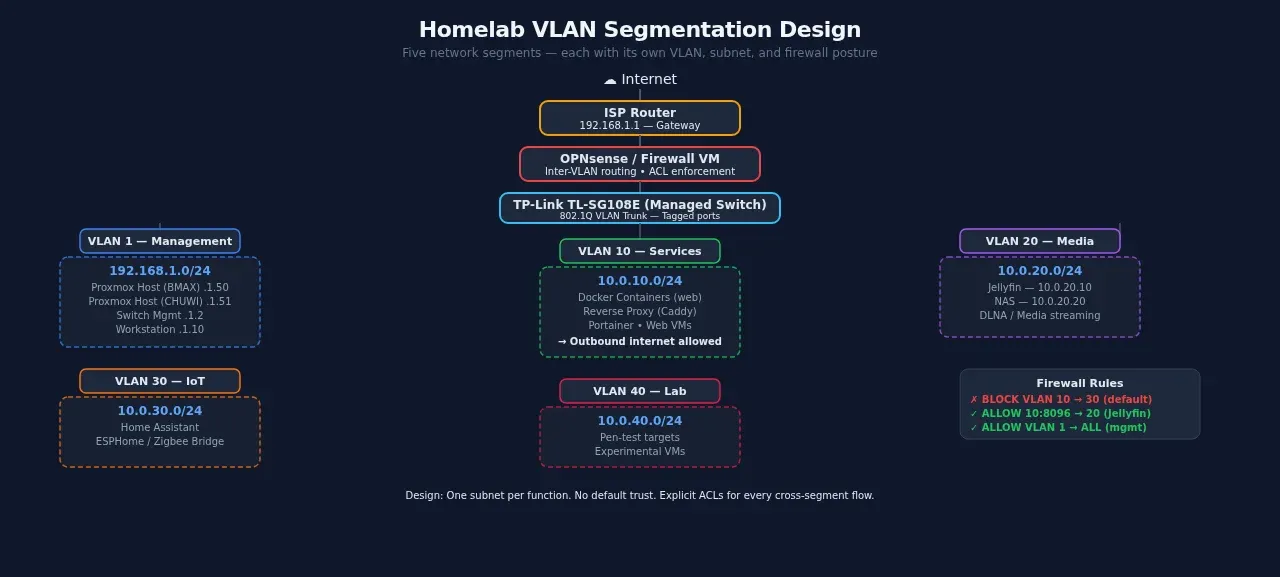
Three design rules:
The hypervisor stays on management, VMs live on workload VLANs. The Proxmox host isn't a workload. It's the platform. If a workload VLAN's routing breaks, you still need console access to the host for recovery. Keeping it on the management VLAN means backups continue, snapshots run, and you can SSH in regardless of what's happening on VLAN 10.
One subnet per function, gateway at the switch or firewall. The routing boundary between VLANs is where policy lives. Every packet crossing from VLAN 10 to VLAN 30 hits the gateway, and that's where you write the rules.
No VLAN trusts another by default. Inter-VLAN traffic is denied. ACLs grant the exceptions. If Jellyfin on VLAN 20 needs to reach the NAS, that's a deliberate permit rule, not a side effect of sharing a broadcast domain.
VLAN Configuration on a Managed Switch
On a TP-Link TL-SG108E (or similar entry-level managed switch):
VLAN ID: 10
Name: Services
Port Members: 1 (tagged), 3 (untagged)
Port 1 is the trunk to the Proxmox host, tagged so it carries multiple VLANs. Port 3 might be a physical device that only speaks untagged traffic.
The switch's 802.1Q config page is where you map VLAN IDs to ports. Tagged ports carry traffic for multiple VLANs (each frame gets a VLAN tag), untagged ports belong to a single VLAN. The Proxmox trunk port should carry every VLAN your VMs need. Tag them all and let Proxmox sort out which VM gets which.
Proxmox Networking
Proxmox bridges are the glue between the physical switch VLANs and your VMs. The config lives in /etc/network/interfaces. If you haven't set up Proxmox yet, start with the
 Techie Mike
guide first — it covers the base install before you add VLANs.
A VLAN-aware bridge setup:
auto vmbr0
iface vmbr0 inet static
    address 192.168.1.50/24
    gateway 192.168.1.1
    bridge-ports enp1s0
    bridge-stp off
    bridge-fd 0
    bridge-vlan-aware yes
    bridge-vids 2-4094
bridge-vlan-aware yes is the important flag. Without VLAN awareness, Proxmox will not handle multiple VLAN-tagged guest interfaces cleanly on that bridge. You can still build VLAN setups in other ways, but a VLAN-aware bridge is the cleanest Proxmox approach when one trunk carries several VM VLANs.
When creating a VM, set the network interface VLAN tag to 10, and that VM lands in the Services VLAN. No DHCP server on VLAN 10? Assign a static IP or run a DHCP server inside that VLAN: a container running dnsmasq, or your router if it supports multiple DHCP scopes.
For containers (LXC), the network config in /etc/pve/lxc/<CTID>.conf:
net0: name=eth0,bridge=vmbr0,firewall=1,hwaddr=AA:BB:CC:DD:EE:FF,tag=10,type=veth
The tag=10 puts the container on VLAN 10. Adding firewall=1 enables the Proxmox firewall for that interface, useful as a second layer of filtering before traffic even hits the switch.
The Management Network Rule
Proxmox's web UI and SSH live on the management bridge (VLAN 1, untagged). Never put the management interface on a workload VLAN. If you lose routing to VLAN 10, you don't want to lose access to the host. The management network should stay reachable even when every workload VLAN is on fire.
Docker Networking
Docker adds a third networking layer on top of the physical switch and Proxmox bridges. Containers on the same Docker network can reach each other by service name. Containers on different Docker networks are isolated unless you explicitly connect them.
The default bridge network (docker0, 172.17.0.0/16) is fine for a single-container experiment. For anything that runs multiple services, create dedicated networks. (New to Docker?
 Techie Mike
it walks you through the fundamentals.)
# docker-compose.yml
networks:
  backend:
    driver: bridge
    ipam:
      config:
        - subnet: 172.20.0.0/24
  frontend:
    driver: bridge
    ipam:
      config:
        - subnet: 172.21.0.0/24

services:
  app:
    networks:
      - backend
      - frontend
  db:
    networks:
      - backend
  proxy:
    networks:
      - frontend
The app container sits on both networks. It can talk to the database on backend and receive traffic from the reverse proxy on frontend. The database is on backend only, with no direct exposure to the proxy network. This is a miniature three-tier web architecture.
How Docker Networks Map to VLANs
Docker networks live inside the Proxmox host. They don't automatically map to physical VLANs. A container on a Docker bridge network can talk to other containers on the same bridge, but it can't reach a VM on VLAN 20 without a route.
For containers that need physical VLAN access, use the macvlan driver:
networks:
  media-vlan:
    driver: macvlan
    driver_opts:
      parent: eth0.20
    ipam:
      config:
        - subnet: 10.0.20.0/24
          gateway: 10.0.20.1
The parent value must match the interface visible inside the Docker host, not necessarily the Proxmox physical NIC. On a Docker VM this might be eth0; on a bare-metal Docker host it might be enp1s0.20; on a Proxmox-hosted setup it depends on whether VLAN tagging is handled by Proxmox, the guest, or a dedicated bridge. The warning that macvlan containers often cannot communicate directly with the Docker host is correct — Docker's macvlan behaviour commonly isolates host/container communication by design.
The trade-off: macvlan containers bypass the host's network stack, so the host itself can't communicate with them on that interface. For most homelab services, stick with bridge networks and use the reverse proxy as the routing layer between Docker and the rest of the network.
# Inspect Docker networks
docker network ls
docker network inspect backend

# See which containers are on which networks
docker inspect --format='{{range $k,$v := .NetworkSettings.Networks}}{{$k}} {{end}}' <container>
For networks that should never reach the internet, Docker's internal: true flag creates an externally isolated network — containers on that network cannot use Docker's normal bridge path to reach external networks. Databases and internal services that only talk to other containers are good candidates.
Reverse Proxy: The Front Door
Every service that needs external access routes through a reverse proxy. I use Caddy because it handles TLS certificates automatically and the config is five lines. nginx and Traefik are equally solid choices.
# Caddyfile
jellyfin.techie.local {
    reverse_proxy 10.0.20.10:8096
}

homeassistant.techie.local {
    reverse_proxy 10.0.30.12:8123
}

portainer.techie.local {
    reverse_proxy 172.20.0.5:9443
}
The reverse proxy sits on the Services VLAN with an interface in the Docker bridge network. From there it reaches Jellyfin on VLAN 20 (via the gateway's inter-VLAN routing), Home Assistant on VLAN 30, and Portainer inside Docker, all through a single TLS-terminated entry point.
Access control happens at the proxy layer. If a service doesn't need internet exposure, don't put it in the Caddyfile. Internal services like databases stay on isolated Docker networks and are reachable only by the containers that need them.
Getting a Let's Encrypt Certificate for Internal Services
Caddy handles this automatically for public domains. For internal-only services (.local or .home.arpa domains), use a DNS challenge with your domain provider's API token:
jellyfin.internal.techie.systems {
    tls {
        dns cloudflare {env.CF_API_TOKEN}
    }
    reverse_proxy 10.0.20.10:8096
}
This gets you a valid certificate for an internal IP without opening port 80 to the internet. The DNS challenge proves you control the domain, and Caddy handles renewal.
Note: the Cloudflare DNS provider is not included in the default Caddy build. Install a Caddy build that includes dns.providers.cloudflare, or build it with xcaddy.
Firewall Rules Between Segments
VLAN segmentation isolates broadcast domains. It doesn't block traffic by default. Two VLANs on the same switch, both trunked to the same Proxmox host, can absolutely talk to each other as soon as there's a route between them. Firewall rules at the routing boundary are what enforce isolation.
On a router or firewall VM (OPNsense, pfSense, or even iptables on the Proxmox host), the rule pattern for a workload VLAN:
# Services VLAN (10.0.10.0/24) rules
allow from 10.0.10.0/24 to 10.0.20.10:8096    # Jellyfin access
allow from 192.168.1.10/32 to 10.0.10.0/24    # Workstation management
block from 10.0.10.0/24 to 10.0.0.0/8         # Block all other inter-VLAN
allow from 10.0.10.0/24 to any                 # Internet outbound
Rule order matters. The default deny catches everything not explicitly permitted. Internet outbound is the last rule. Everything else is inter-VLAN and gets evaluated first.
For Docker containers with iptables:
# Allow a container to reach Jellyfin on the Media VLAN
iptables -A DOCKER-USER -s 172.20.0.5 -d 10.0.20.10 -p tcp --dport 8096 -j ACCEPT

# Block that container from reaching anything else
iptables -A DOCKER-USER -s 172.20.0.5 -j DROP
The DOCKER-USER chain is the right place for custom Docker firewall rules. Docker inserts its own rules in the DOCKER chain, and DOCKER-USER is evaluated first.
Be careful with broad DROP rules in DOCKER-USER. Add required DNS, gateway, update-server, and established-connection rules first, or you may cut the container off from more than intended.
Commands That Actually Tell You What's Happening
Theory is fine. These are the commands I run when I'm debugging the network:
# What networks exist on this Docker host?
docker network ls

# Which containers are on which network?
docker network inspect backend | jq '.[].Containers | to_entries[] | {name: .value.Name, ip: .value.IPv4Address}'

# What routes does this machine have?
ip route show

# Which VLAN-tagged interfaces exist?
ip -d link show | grep -i vlan

# What's listening on which ports?
ss -tlnp

# Trace the route a packet takes to a service
traceroute 10.0.20.10

# Is the firewall blocking this?
iptables -L DOCKER-USER -n -v
The docker network inspect command is the one I reach for most. It shows you exactly which containers are on a network, their IPs, and their MAC addresses. Invaluable when you're trying to figure out why service A can't reach service B.
What I'd Do Differently
I built this incrementally. If I were starting from scratch, I'd do four things differently:
Start with a Managed Switch
I spent months on an unmanaged switch, working around the lack of VLANs with separate physical interfaces and USB Ethernet dongles. A managed switch would have saved me a dozen evenings of network gymnastics.
One VLAN per Function, Not per Project
I initially created a VLAN per application (Jellyfin VLAN, Home Assistant VLAN, etc.). That's too granular for a homelab. Three or four functional VLANs (management, services, media, lab) cover everything without turning your switch config into a part-time job.
Document the IP Scheme Before You Need It
When you're troubleshooting at midnight, a text file with every static IP, VLAN assignment, and port mapping is worth its weight in sleep. I keep mine in Obsidian, but a markdown file in the repo works fine.
Don't VLAN-Tag Your Workstation Port
Tag it wrong and you lose access to the switch management interface. Keep one untagged management port as a recovery path.
The CS Angle — Why This Matters for Students
If you're studying Cambridge IGCSE or A-Level Computer Science, a homelab network is the most practical way to internalise the networking syllabus. Subnetting, network segmentation, and subnetwork models are in the A-Level spec (9618) — and VLANs are how those concepts play out on real hardware. Subnet masks, CIDR notation, the role of routers and switches — it's all there.
But textbooks teach these concepts in isolation. A VLAN is a paragraph. A subnet mask is a slide. A homelab makes them real: you type ip route show, you see the routing table. You configure a VLAN on a switch, you watch tagged frames hit the port. You misconfigure a subnet mask and suddenly two devices can't talk, and you understand why in a way no exam question can replicate.
Even the security concepts click differently. "Defence in depth" is an abstract principle until you're writing iptables rules that block a compromised container from pivoting to your NAS. Then it's not theory anymore. It's your data.
Getting Started — The Quick-Start Template
A minimal setup you can stand up in an afternoon:
- Buy a managed switch. TP-Link TL-SG108E or similar entry-level managed switch. 8 ports, VLAN support, web-managed. Plug it in between your ISP router and your Proxmox host.
- Create three VLANs on the switch. Management (VLAN 1, untagged), Services (VLAN 10, tagged), Lab (VLAN 40, tagged). Tag the port that connects to your Proxmox host. Before changing anything, make sure you have one untagged management port left as a recovery path.
- Enable VLAN-aware bridge on Proxmox. Add
bridge-vlan-aware yesto/etc/network/interfaceson your bridge. Assign VM network interfaces to VLAN 10 or 40 with thetagparameter. - Create dedicated Docker networks. Stop using the default bridge. Define
backendandfrontendnetworks in your Docker Compose files. Put databases onbackendonly. - Set up a reverse proxy. Install Caddy or nginx on a VM or container in the Services VLAN. Add proxy entries for the services you want to access externally.
That's the skeleton. Everything else (firewall rules, inter-VLAN routing, macvlan for specific use cases) you add as the homelab grows.
Start flat. But when the flat network stops working (and it will), you'll know which pieces to reach for.